
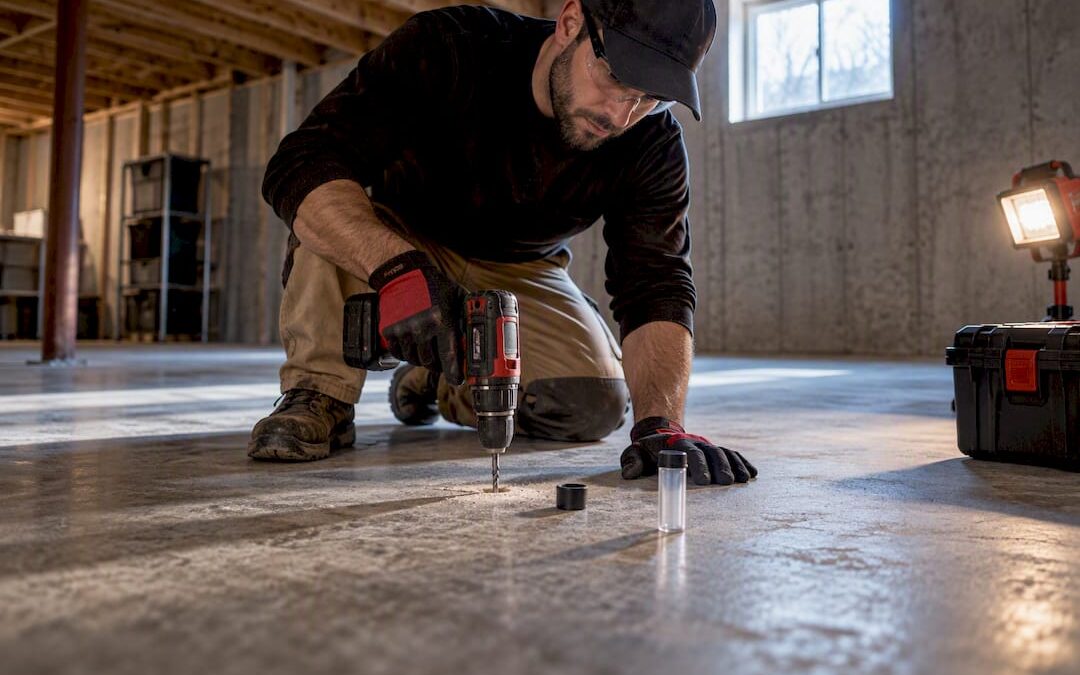
Yes, you can tile directly over a concrete basement slab, but only after it passes moisture testing and any structural repairs are done. The single condition that decides success or failure is vapor: a slab that looks dry can still be pushing moisture upward, and that moisture is what causes loose tile, mold, and grout failure years later. Test first, mitigate if needed, then tile.
TL;DR:
- Moisture testing using ASTM F2170 or ASTM F1869 is essential before installing tile, as dry-looking slabs may still have unsafe moisture levels.
- Acceptable humidity levels generally fall below 75-85 percent RH, and high readings require specific vapor mitigation measures before tiling.
- Installing a vapor barrier or crack-isolation membrane depends on moisture test results and slab condition, with more aggressive solutions needed for higher moisture levels.
- Porcelain is recommended for basement floors due to its low water absorption, with proper prep, membrane, and flatness being critical regardless of tile quality.
- Proper installation sequence includes testing, crack repair, leveling, membrane application, dry-laying, and careful setting to prevent failure caused by overlooked moisture or movement issues.
Table of Contents
- How Do You Know If a Basement Slab Is Ready for Tile?
- Which Membranes Stop Moisture and Cracks From Ruining Your Tile?
- Which Tiles, Adhesives, and Grout Actually Hold Up in a Basement?
- What Are the Steps to Install Tile Over a Basement Slab?
- What Causes Basement Tile Installations to Fail?
- What Do Contractors Actually Check Before Tiling a Basement?
- Why Moisture Testing Beats Every Other Basement Tile Decision
- Get Basement Tile Installed Right the First Time
- Sources
- FAQ
How Do You Know If a Basement Slab Is Ready for Tile?
A slab that feels bone dry can still fail a moisture test, and that gap catches more DIYers than any other step in this whole project. Before you buy a single tile, you need real data on what’s happening below the surface, not a guess based on how the concrete looks or smells.
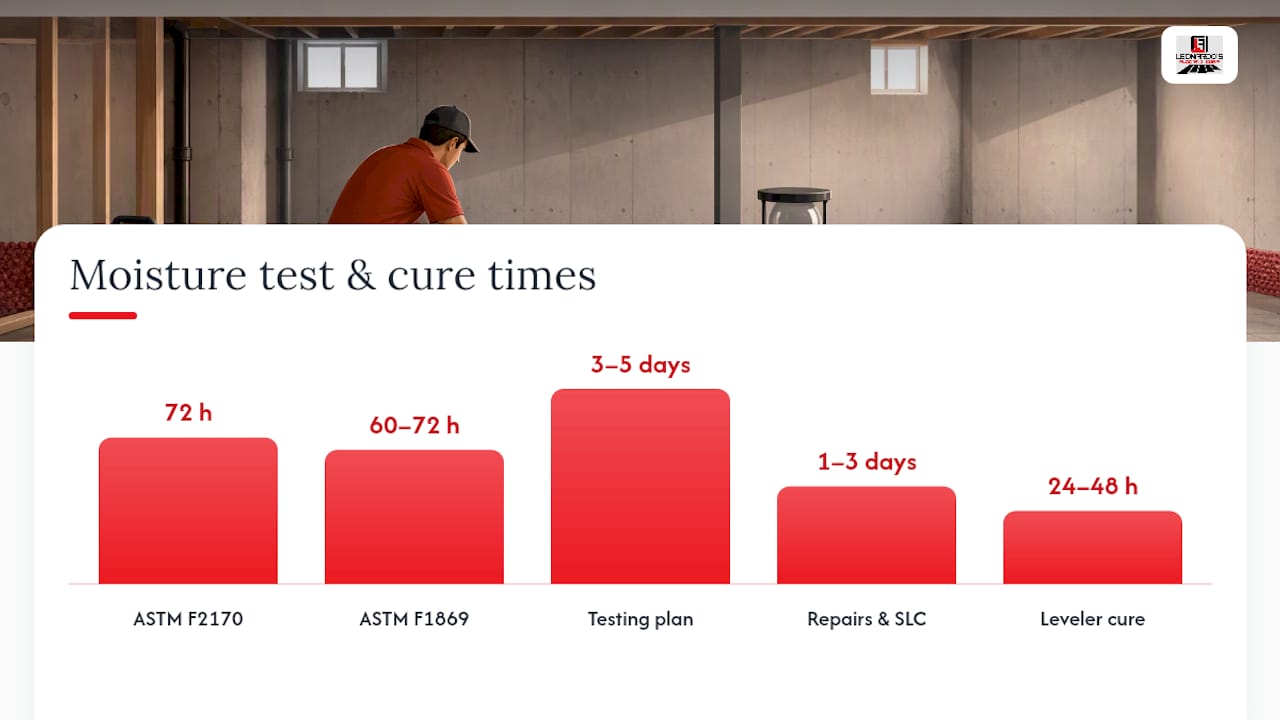
The two industry-recognized methods are ASTM F2170 (in-situ relative humidity) and ASTM F1869 (calcium chloride, also called an MVER test). F2170 involves drilling small holes into the slab, inserting probes, and letting them equilibrate for 72 hours to measure humidity deep inside the concrete. F1869 places a calcium chloride dish on the surface for 60 to 72 hours and measures how much moisture the slab releases, expressed as pounds per 1,000 square feet per 24 hours. Most flooring manufacturers and contractors favor F2170 for basements because it reads moisture at multiple depths, not just the surface skin, which matters more below grade where moisture migrates upward from soil contact.
There’s no universal pass/fail number since it depends on your specific tile adhesive and membrane manufacturer’s published limits, but many thinsets and membranes cap acceptable RH readings in the 75 to 85 percent range. If your reading lands close to that ceiling, don’t split the difference and hope. Basement slabs sit against soil and, often, a poor or missing vapor retarder underneath, so marginal readings tend to get worse in humid seasons rather than better.
Beyond moisture, walk the slab and check for:
- Cured age: fresh concrete needs at least 28 days to cure before any coating or tile goes down.
- Old coatings, paint, or sealers that block bonding and need mechanical removal.
- Oil, adhesive residue, or carpet glue left from previous flooring.
- Cracks, both hairline and structural, and whether they’re active or stable.
- Flatness: most tile installations require the slab within 1/8 inch over 10 feet, tighter for large-format tile.
- Any sign of active water intrusion, standing water, or seepage after rain.
Realistic timeline: budget three to five days for moisture testing alone, since both ASTM methods require multi-day equilibration. Crack repairs and self-leveling compound add another one to three days depending on square footage, and freshly leveled compound often needs 24 to 48 hours of cure before you can tile over it. Rushing this phase is the single most common way homeowners turn a one-week project into a two-month callback.
Which Membranes Stop Moisture and Cracks From Ruining Your Tile?
Vapor control and crack isolation solve two different problems, and conflating them is where a lot of basement tile jobs go wrong. A vapor barrier blocks moisture vapor from reaching the tile assembly. A crack-isolation or uncoupling membrane absorbs slab movement so a hairline crack in the concrete doesn’t “telegraph” straight up through your grout lines within a year or two.
Sheet membranes and fleece-backed uncoupling mats handle mild to moderate moisture and virtually all crack-isolation needs. Installing tile directly to a clean, cured slab with polymer-modified thinset works fine when the slab meets flatness and moisture criteria, but crack-isolation membranes are recommended wherever the slab has visible cracks or control joints, which describes most basement floors sooner or later. These uncoupling mats also help vapor dissipate laterally when installed per the manufacturer’s directions, giving you a small moisture-management benefit even when a full vapor barrier isn’t strictly required.
When your RH or calcium chloride readings come back high, a sheet membrane isn’t enough. That’s when you move to a liquid-applied or two-part epoxy vapor barrier, which forms a continuous seal across the entire slab. These systems are the most aggressive mitigation option on the market, and manufacturers publish specific MVER and RH limits their products are rated to handle, so match the product to your actual test numbers rather than assuming the strongest option is always the safest bet. If your readings are only moderately high, a combined approach, targeted crack isolation plus a liquid membrane just in the problem zones, often costs less than a full epoxy pour and still solves the issue.
Installation basics that matter regardless of which membrane you choose:
- Clean and prime the slab exactly per the manufacturer’s spec before rolling or troweling anything down.
- Seam-tape sheet membranes according to instructions; skipped seams are where vapor sneaks through.
- Confirm thinset compatibility. Not every mortar bonds well to every membrane surface.
Pro Tip: If only part of your basement shows cracking or elevated moisture, you don’t need to membrane the whole floor. Isolate the problem area and blend the transition with a properly placed movement joint instead of paying for full coverage you don’t need.
Which Tiles, Adhesives, and Grout Actually Hold Up in a Basement?
Porcelain is the material of choice for basement floors, and the reason comes down to water absorption. Porcelain’s very low absorption rate makes it the top performer for below-grade installations, where humidity and occasional dampness are simply part of the environment. That said, porcelain isn’t a substitute for proper prep. Slab testing and the right membrane still matter, no matter how good the tile is.
- Pick your finish for the room’s use. Matte or textured porcelain gives better slip resistance for basements that double as laundry rooms or workout spaces; polished finishes look great but get slick fast near sump pumps or utility sinks.
- Use polymer-modified thinset, never mastic. Mastic doesn’t cure hard enough for below-grade moisture exposure and is a leading cause of tile delamination in basements.
- Choose grout by moisture exposure. Cementitious grout needs sealing after cure; epoxy grout costs more but resists staining and moisture without a separate sealing step, which is worth it near any water source.
- Match tile size to your slab’s flatness. Large-format tile (anything over 15 inches per side) demands tighter flatness tolerances and more careful back-buttering; smaller formats forgive minor slab imperfections better.
- Think about radiant heat now, not after. If you want a heated basement floor, an electric mat system installs under tile more easily than most other flooring types, but it needs to go in before the membrane stage.
Tools worth having on hand: a moisture meter or test kit, a long straightedge, a wet saw, a notched trowel sized to your tile, spacers, a rubber grout float, and a margin trowel for back-buttering.
What Are the Steps to Install Tile Over a Basement Slab?
Here’s the sequence that actually works, in the order it needs to happen. Skipping steps or reordering them is how a weekend project turns into a floor you’re ripping out in 18 months.
-
Demolish and clean. Remove any existing flooring, carpet, or old tile down to bare concrete. Strip old adhesive residue mechanically with a floor scraper or grinder. Coatings and glue left behind will block bonding no matter how good your thinset is.
-
Test for moisture. Run your ASTM F2170 or F1869 test now, before you spend money on materials. Testing after you’ve already bought $2,000 in porcelain doesn’t change what the slab tells you, it just makes bad news more expensive.
-
Repair cracks and structural issues. Fill hairline cracks with a flexible crack-filler compatible with your membrane system. Anything wider or showing vertical displacement needs a structural assessment before you go further, not a cosmetic patch.
-
Level the slab. If your flatness check showed more than 1/8 inch of variation over 10 feet, or you’re setting large-format tile, pour a self-leveling compound. Self-leveling compounds are standard practice ahead of large-format tile, and manufacturers specify exact flatness tolerances you need to hit to avoid lippage, those slightly raised tile edges that catch your toe and look bad from day one. Let it cure fully, typically 24 to 48 hours, before moving on.
-
Install membrane or vapor barrier if required. Based on your moisture readings from step two, install a crack-isolation membrane, a full sheet membrane, or a liquid vapor barrier. Follow the manufacturer’s cure time before setting tile on top. This is not a step to rush to save a day.
-
Dry-lay your tile pattern first. Before any mortar goes down, lay tiles dry across the room to plan your layout, minimize cut pieces at visible edges, and confirm your spacing works with the room’s dimensions.
-
Set the tile. Spread thinset with a notched trowel sized for your tile format, and for anything over 8 inches per side, back-butter each tile individually. Back-buttering and hitting roughly 95 percent mortar coverage is what prevents hollow spots under large-format tile; check your work periodically by tapping tiles and listening for a hollow sound, which signals a void underneath that needs to be pulled up and reset.
-
Place expansion joints. Leave a soft, flexible joint around the room’s perimeter and at intervals across large fields, following TCNA guidance on movement joints, so slab movement doesn’t crack your tile surface. Skipping this step is one of the most common and most expensive mistakes in basement tile work.
-
Grout and seal. Once thinset has cured (usually 24 to 48 hours), apply grout, then let it cure per the manufacturer’s timeline, generally 24 to 72 hours, before foot traffic. If you used cementitious grout, seal it after full cure. Avoid heavy water exposure on the floor for at least a week.
Pro Tip: Don’t grout the day after setting tile just because the thinset feels dry to the touch. Surface dryness doesn’t mean full cure strength, and grouting too early can shift tiles slightly and crack the grout lines within weeks.
What Causes Basement Tile Installations to Fail?
The three most expensive mistakes on a basement tile job are skipping moisture testing, using mastic instead of thinset, and leaving out expansion joints. Each of these shows up repeatedly in failed installations, and all three are 100 percent avoidable with basic planning.
Watch for these warning signs after installation:
- Hollow-sounding spots when you tap tiles, which means the mortar didn’t bond fully underneath.
- Tiles that feel loose or shift slightly underfoot.
- A white, powdery residue on the grout or tile surface, called efflorescence, which signals moisture moving through the slab.
- A musty smell coming from the floor, especially in a closed-up basement room.
- Grout that’s cracking along the same lines repeatedly, often a sign of missing movement joints.
Trapped moisture between an impermeable tile layer and a damp slab is exactly the condition mold needs to grow, so any of these signs deserve fast attention. A few loose tiles near a doorway can sometimes be popped up, cleaned, and reset with fresh thinset as a weekend fix. Widespread hollow spots, efflorescence across the floor, or a persistent musty smell almost always mean the moisture problem is systemic, and that calls for full removal, remediation, and reinstallation rather than a patch job.
What Do Contractors Actually Check Before Tiling a Basement?
On every basement job, the decision rule is the same: test, repair, add a membrane if the numbers call for it, then set porcelain in polymer-modified thinset. That order never changes, no matter how the slab looks on the surface.
DIY installs typically run lower in material cost but stretch out over multiple weekends once testing wait times, leveling cure, and membrane installation are factored in. Professional installs move faster because a crew handles testing, prep, and setting in sequence without gaps between steps, though the labor cost reflects that speed and expertise. Either path works if the moisture data gets respected.
[brand_signal: Leonardo’s Flooring Corp field experience]
Why Moisture Testing Beats Every Other Basement Tile Decision
Most basement tile advice online focuses on which tile looks best or which grout color to pick. That’s backwards. The single biggest factor determining whether your floor lasts five years or fifteen is a test most homeowners skip entirely because it feels like an unnecessary delay.
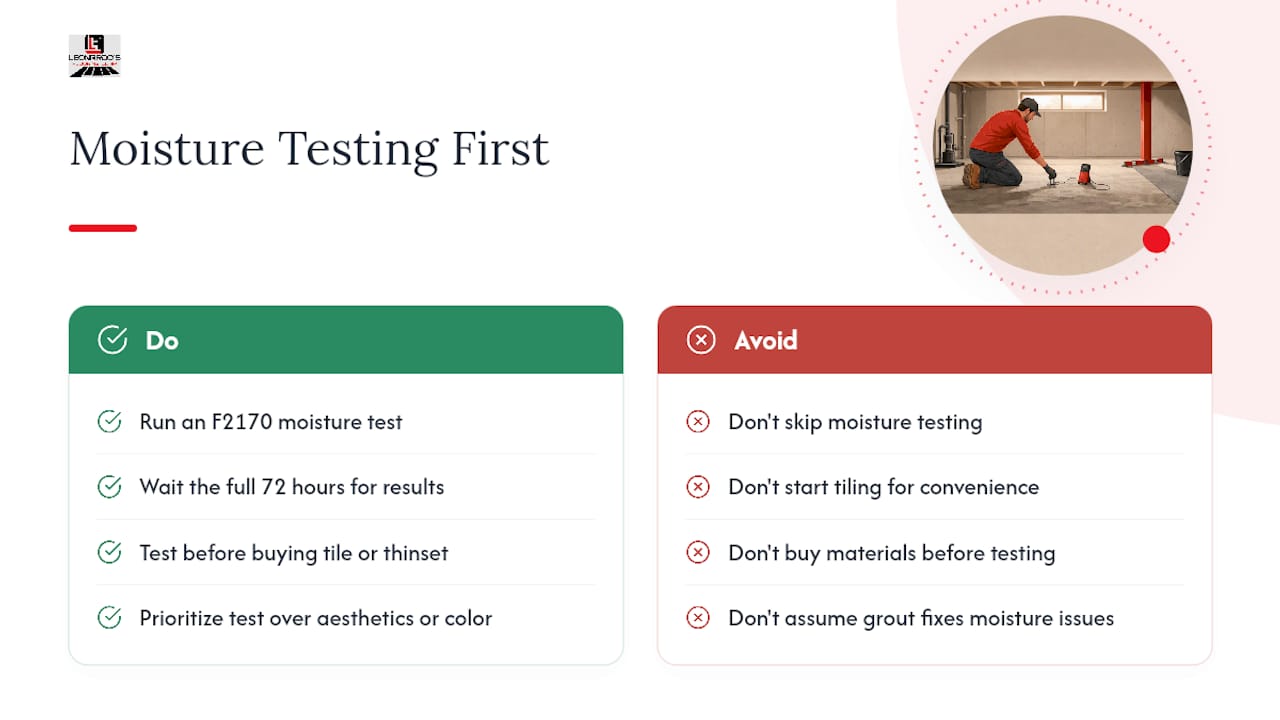
I’d argue the conventional DIY advice undersells moisture testing because it’s inconvenient, not because it’s unimportant. Waiting 72 hours for an F2170 reading feels like wasted time when you’re excited to start tiling. But that’s exactly backwards: the slab has been sitting there for years, and one more week of testing costs you nothing compared to tearing out failed tile eighteen months later.
If you take one thing from this guide, prioritize the test before you buy a single tile or thinset bag. Everything else, tile selection, membrane choice, even your grout color, is a decision you can change your mind on. A slab you tiled without knowing its moisture profile is a decision you’re stuck with.
— Jim
Get Basement Tile Installed Right the First Time
Some flooring contractors offer slab assessment and moisture testing services to Denver homeowners before tile installation. Experienced professionals typically start with a test-first approach rather than guessing based on how dry the concrete looks.
A consultation typically includes a walk-through of your basement slab, a discussion of moisture testing needs, and a written estimate covering prep, membrane work if required, and the full tile flooring installation. We tailor every project to your budget and timeline rather than pushing a one-size-fits-all package, which is part of why we’ve built up 125+ five-star reviews from homeowners across the area. If you’re also weighing other basement flooring options, we cover subfloor preparation as a standalone service too. If active water intrusion is part of your basement’s story, pair your tile plan with a look at waterproofing and plumbing fixes before you tile over it. Reach out through our services page to schedule a slab assessment and get a real number instead of a guess.
Sources
- How to Install Tile over Concrete Slabs (InspectApedia best practices)
- Tiles for basement concrete floor: Pros, Cons, and Buying Guide – D and G Flooring
- Can mold grow on concrete under tile? – Grounded In Concrete
FAQ
What Is the Cheapest Way to Cover a Basement Concrete Floor?
Sealed or stained concrete is generally the lowest-cost option since it skips tile, adhesive, and membrane materials entirely. Vinyl plank comes in as a budget-friendly step up, though porcelain tile remains the stronger long-term choice for moisture resistance if your budget allows for proper prep.
Can Mold Grow Under Tile Flooring on Concrete?
Yes, mold can grow under tile when moisture gets trapped between the tile layer and a damp slab. Controlling vapor with proper testing and mitigation, plus removing organic debris before installation, significantly reduces that risk.
Can I Lay Tile Directly Over Concrete?
Yes, as long as the slab is clean, fully cured, structurally sound, and passes moisture testing. Polymer-modified thinset bonds well to a properly prepped slab, though cracked or high-moisture slabs need a membrane first.
Can You Tile Straight Over Concrete Without Any Prep?
No. Skipping moisture testing, crack repair, or leveling is one of the most common reasons basement tile fails within a couple of years. A brief prep sequence, test, repair, level, membrane if needed, protects the investment far more than it delays it.
How Much Does It Cost to Tile a Basement Floor?
Costs vary widely based on tile choice, membrane needs, and whether you hire a professional or do it yourself, with DIY typically cheaper in materials but slower in total project time. Leonardo’s Flooring Corp provides project-specific estimates after assessing your slab, so current pricing is available by requesting a consultation.