
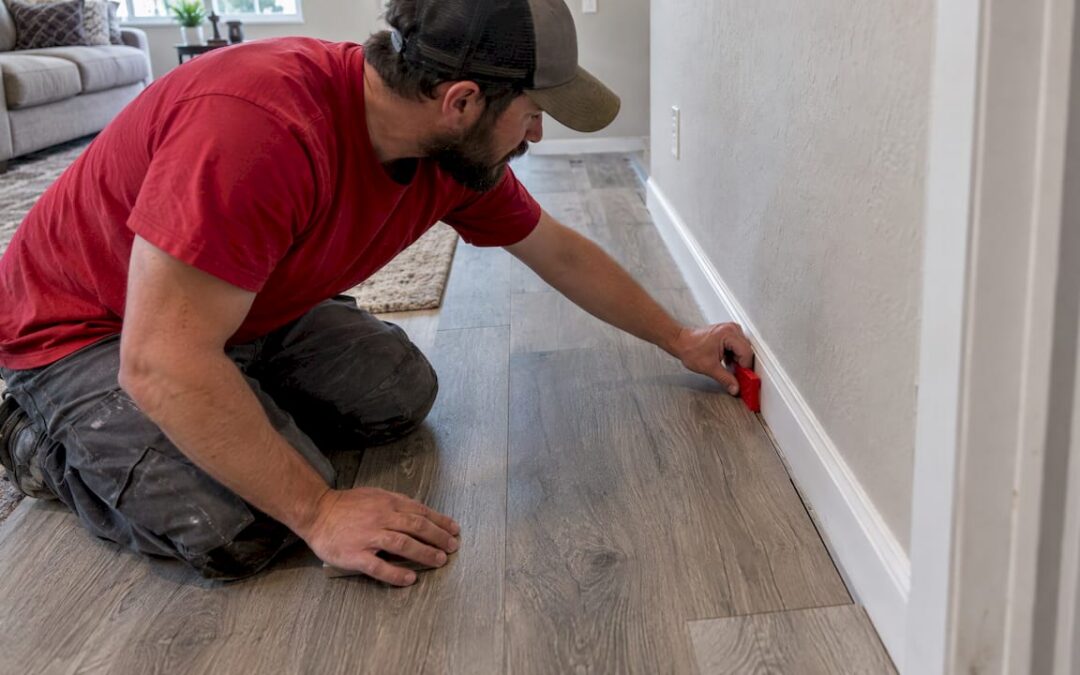
Leave 1/4 inch of clear space between click-lock vinyl plank and every wall, cabinet, pipe and other fixed object, unless your product’s installation sheet says more. Many manufacturers ask for 1/4 inch. Some require 3/8 or 1/2 inch for large rooms or less stable subfloors. The gap lets a floating floor swell and shrink with temperature instead of pushing against your walls, and baseboard or quarter-round hides it afterward. If you are planning a vinyl floor in the Denver area, we can install it with the gap, the trim and the subfloor handled together. See our vinyl flooring services.
What are the key takeaways for LVP expansion gaps?
- The key takeaways for LVP expansion gaps are: Plan on a minimum of 1/4 inch around all walls, cabinets, pipes and door frames, but always follow your product’s installation guide. Large rooms, long runs, or floors over wood subfloors or spaces without steady heating and cooling often need 3/8 to 1/2 inch. Remember, trim is nailed to the wall, never through the plank, and nothing rigid (like caulk or adhesive) should go into the gap. Door jambs should be undercut for planks to slide beneath, and doorways or long runs often require a T-molding break. Issues like buckling, peaking, and open seams after installation typically result from a floor that was pinned or had insufficient room.
Table of Contents
- What an expansion gap is and why LVP needs one
- How wide the gap should be
- Where the gap goes
- Finishing the edges without closing the gap
- Before the first plank: conditions that keep the gap working
- What goes wrong when the gap is too small or blocked
- Our perspective
- Getting it done right in the Denver area
- FAQ
- Sources
What an expansion gap is and why LVP needs one
An expansion gap is clear space between the flooring and a fixed boundary. It lets a connected floating floor expand and contract without pressing on walls, pipes, door frames or permanent fittings.
The reason is how click-lock plank is built. The planks lock to each other and are not fastened to the subfloor, so a whole room behaves like one large sheet. When that sheet warms up, it grows. When it cools, it shrinks. The gap is part of how a floating floor works, not a sloppy edge.
The movement is small per plank but adds up. In a case study, Shaw Floors measured a 48-inch vinyl plank shrinking 1/16 inch at 32.2°F and growing 1/16 inch at 135°F. That works out to roughly 1/8 inch of movement per 100 degrees of temperature change. The same study says that if a trim fastener or anything else pins the floor, planks can separate in the field of the floor. It also names temperature as the main driver of peaking, gapping and lifting, and notes that sunny floor areas can pass 130°F.
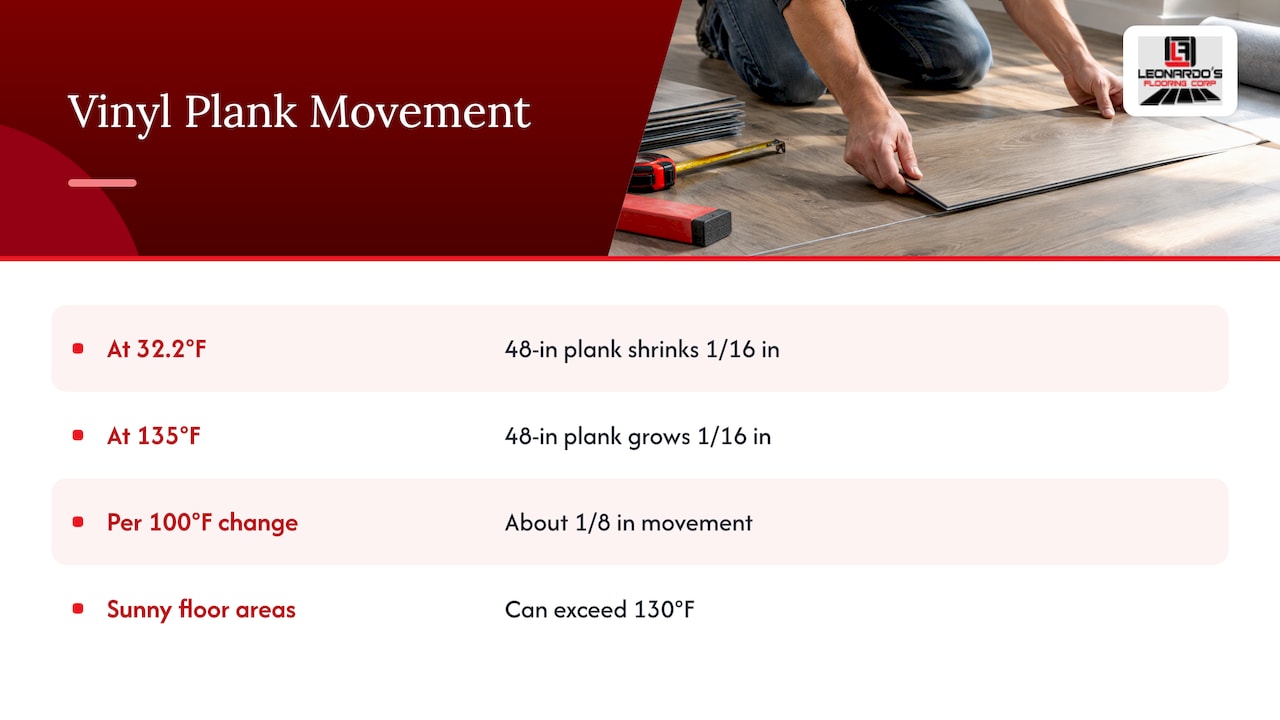
That last point matters in Colorado homes. A room with big south- or west-facing glass, a sunroom or an entry with a sliding door can see a floor surface far hotter than the thermostat suggests. Those rooms are where a tight gap shows up first.
How wide the gap should be
There is no single number for every product. Published requirements run from a quarter inch to half an inch, and the size is set by the product, not by habit. The only number that counts for your floor, and for your warranty, is the one in the installation instructions for the exact product you bought.
These published guides show the range:
| Product guide | Gap required | Notes |
|---|---|---|
| Shaw Floorté Classic | 1/4 in. under 2,500 sq ft; 1/2 in. over 2,500 sq ft | Applies to floating and glue-down; undercut door jambs |
| Tarkett VeriCore and IntegraCore | 1/4 in. minimum; 1/2 in. over moisture-affected wood subfloors or spaces without permanent HVAC | Room kept between 65°F and 85°F for 48 hours before, during and after |
| Eastern Flooring Shenandoah | 1/4 in. under 40 ft; 3/8 in. for 40 to 65 ft; over 65 ft call technical support | Sized by the longest run of floor |
| LifeProof (2025 guide) | 1/4 in. (6 mm) around walls and heavy fixed objects | Transition moldings required past 100 linear ft in any direction |
| Tilebar Rigid Core-Click | 1/4 in. under 2,500 sq ft; 1/2 in. over 2,500 sq ft | 1/2 in. over wood substrates affected by moisture or without permanent HVAC |
| Lowe’s rigid core LVP guide | 1/4 in. minimum under 2,500 sq ft; 3/8 to 1/2 in. above | Remove wall spacers and cover the gap with base or quarter round |
| CaliFloors Cali Plus WPC | 1/4 in. minimum, plus about 1/16 in. for every extra 10 ft once the area passes 30 ft | T-molding in doorways and openings |
Three patterns come out of the table.
Size of the room changes the number. Some guides step up at 2,500 square feet. Others scale the gap with the longest run, and some require a transition break at a set length. Open-plan main floors, finished basements and commercial spaces are where this matters.
The subfloor and the air change the number. Several guides ask for 1/2 inch over wood subfloors that moisture can affect, and in spaces without permanent heating and cooling, such as crawlspaces, mobile homes or three-season rooms. A floor over a basement slab in a conditioned home is a different case from a floor over a sunroom.
Bigger is safer than smaller. General guidance for floating LVP is 1/4 to 3/8 inch at the perimeter, with more in wide-open areas. If your guide gives a minimum, the extra eighth of an inch costs you nothing, because the trim covers it.
A worked example: a 14 by 20 foot living room in a conditioned Aurora home, using a product with a 1/4-inch minimum. The longest run is 20 feet, well under every length threshold in the table, so 1/4 inch all around is correct. Now run that same plank through the living room, hallway and kitchen as one 45-foot sweep. A guide like the Shenandoah sheet moves you to 3/8 inch, and a guide with a 30-foot rule puts a T-molding break in the middle. The room did not change. The run did.
Where the gap goes
The gap goes everywhere the floor meets something that does not move with it. That means:
- Perimeter walls. The full length of every wall, including inside closets.
- Cabinets, kitchen islands and tub surrounds. Floating plank runs up to them with a gap, not underneath them. Heavy fixed objects such as cabinetry or baths are named in the manufacturer guides.
- Pipes, vents and toilet flanges. One guide asks for around all walls, cabinets, pipes and toilet flanges. For a pipe, drill the hole about 3/4 inch larger than the pipe’s diameter so a trim collar can cover it.
- Door frames. The better method is to undercut the jamb and casing so the plank slides underneath. That leaves a clean look and keeps the gap hidden. One installation guide describes using a handsaw laid flat on a scrap piece of flooring as the depth guide, and says never to undercut metal door casings.
- Stairs, fireplaces, thresholds and sliding-door tracks. Treat anything fixed to the structure as a wall.
Doorways and room-to-room breaks
A floating floor that runs through a doorway ties two rooms together. Several guides therefore require a break. EverStep’s guidelines call for a transition break every 30 feet in either direction and a T-molding in doorways under 6 feet wide. One guide asks for T-molding in doorways and archways 6 feet or less in width, with at least 5/16 inch on either side of the track. Another Home Depot vinyl plank guide requires transition pieces in areas over 80 feet long or wide.
The thresholds differ by brand, so read yours. The principle does not: each section of floor gets its own clear boundary. Where vinyl meets tile or carpet, the transition piece needs to be chosen for height as well as movement, which we cover in our guide to a tile to carpet transition.
Finishing the edges without closing the gap
The gap is covered, not filled. Baseboard, shoe molding or quarter-round sits on top of the edge and hides the opening, and it must not touch the plank in a way that traps it.
The rules from the manufacturer guides are consistent:
- Nail trim to the wall, not through the floor. One guide says to replace the molding or wall base with slight clearance above the planks and nail it into the wall. Eastern Flooring’s sheet adds that nothing should be fastened through the floor, including cabinets, toilets, trim or molding.
- Remove the spacers first. The spacers you used to hold the gap during layout come out before trim goes on. A leftover spacer is a rigid block in the gap.
- Reuse or replace the base. You can reuse existing base, shoe molding or thresholds to cover a 1/4-inch gap, as long as the piece is tall enough to hide it and sits clear of the plank.
- Keep the gap empty. Caulk, grout, construction adhesive and tight-fitting trim can lock a floating floor in place. Leave the clearance open and let the trim do the covering.
- Use T-molding at breaks. Where planks meet another floor or a doorway run, the transition piece spans the gap and is fastened to the subfloor or track in the way its instructions specify, not to the plank.
If you do not want to see a flat, shallow shoe molding along your old painted baseboards, a taller new baseboard is the usual fix, and it also covers a generous gap. Baseboards and quarter-round are part of our regular work, so the trim and the floor are finished in the same visit.
For homeowners who have heard that some floors glue down instead of float, the gap rules change with the method. A floating floor needs the perimeter kept clear, and a good explanation of floating versus glued flooring shows how that clearance should stay unobstructed. For LVP, though, the Shaw guide above shows even glue-down products can call for the same gap, so check the sheet rather than assuming.
Before the first plank: conditions that keep the gap working
The gap does its job only if the floor starts in stable conditions.
- Room temperature. Tarkett requires 65°F to 85°F for 48 hours before, during and after installation. LifeProof’s guide sets a wider band of 50°F to 100°F with the HVAC on and working through the whole job.
- Acclimation. LifeProof says residential and light commercial jobs do not generally need acclimation if the product is stored properly, while full commercial applications need 48 hours. Other makers have their own rules, so follow the sheet in your box.
- A flat, clean subfloor. Click-lock edges flex over bumps and dips, and that stress shows up as separated seams later. Subfloor preparation is one of the services we offer, and it is the step that decides whether the gap can do its work. For a bathroom, our page on LVP in bathrooms covers testing, leveling and acclimating.
A new floor that sits in 90-degree afternoon sun by a patio door, or in a basement that was never heated until after install, is the one that fails. Tell your installer about both before layout, because they change the gap.
What goes wrong when the gap is too small or blocked
A pinned floor has nowhere to go when it heats up, so it moves up or sideways. Eastern Flooring’s sheet warns that failing to maintain a floating installation can lead to buckling or disengaging. Shaw’s study warns of separation in the middle of the floor when something impedes movement.
The common signs, and the usual cause:
| What you see | Likely cause |
|---|---|
| Planks peaking into a ridge or tent, often near a sunny window | Floor expanded and had no room, or was pinned by trim |
| Gaps between plank ends or edges that open in cold weather | Floor contracted, often because it was pinned in one spot and pulled apart elsewhere |
| Lifted planks along one wall | Spacer, caulk or tight trim touching the plank |
| Cracking or clicking in a doorway | No transition break; two rooms moving as one |
| Plank ends popping near a pipe or vent | Hole cut too snug around the pipe |
How can you fix LVP expansion gap issues?
Start with the cheapest check: look at the edges. For gaps caused by a short perimeter clearance, the repair begins by pulling the baseboard and quarter-round to see whether the floor has room. Often the cause is a trim nail through the plank, a leftover spacer, or a bead of caulk. Remove it, let the floor settle, and refit the trim to the wall with clearance.
If the floor is tight against the wall with no clearance at all, the fix is trimming the planks back along that edge to restore the gap, which is a job for an installer. A floor that has been pinned in the field often needs a section lifted and relocked. Do not force peaked planks flat with weight or screws, because that pins them again.
If you are not sure whether a gap is a normal seasonal opening or a symptom of a pinned floor, the answer is in the perimeter and the doorways. Pull one piece of trim in the worst spot and look.
Our perspective
Most callbacks on click-lock vinyl do not come from bad planks. They come from the last half inch of the job: a trim nail that went through the floor, a spacer left behind, a doorway that was never given a break.
When we plan a vinyl floor, we start with the room, not the box. How long is the longest run? Is there a slider with full sun? What is under the floor? Those answers set the gap, the transitions and the subfloor work, and we tailor them to your budget and timeline with no surprises.
A gap that you cannot see is a gap that did its job. We want the baseboard to look like it was always there, and the floor to stay flat through a Colorado summer afternoon.
Jim
Getting it done right in the Denver area
If you are replacing floors in a home or commercial space, you get the best result when one crew handles the subfloor, the plank, the transitions and the trim. We have served the greater Denver area for over 10 years, from Denver and Aurora to Boulder and Castle Rock, and our 125+ five-star reviews come from that kind of whole-job work. We install vinyl, laminate, hardwood and tile, prepare subfloors, and fit baseboards, quarter-round and stair parts.

Tell us the rooms, the product you have in mind and any problem spots such as sunny doors or older subfloors, and we will plan the gap for each. Start at our vinyl flooring page or see all of our flooring services. If you are still deciding on a product, our overview of what LVP flooring is explains how it compares.
FAQ
Do I need an expansion gap with vinyl plank if it is glued down?
Often yes. Some glue-down guides still call for a perimeter gap. The Shaw Floorté guide, for example, gives the same 1/4-inch and 1/2-inch figures for floating and glue-down installs. Read the sheet for your exact product.
Is 1/8 inch enough for an LVP expansion gap?
Some older or product-specific instructions list 1/8 inch, but most guides cited above start at 1/4 inch. Because trim hides the extra space, we plan on at least 1/4 inch unless your sheet requires more.
What do I put in the gap between the wall and the plank?
Nothing. The gap stays empty, and baseboard, shoe molding or quarter-round covers it. Trim is nailed to the wall with slight clearance above the plank. Caulk, adhesive and tight trim can lock the floor.
How do I finish the edges of LVP?
Use baseboard or quarter-round along walls, a T-molding in doorways and between long runs, and a transition piece where the plank meets another floor. The door jambs are undercut so the plank slides beneath them, which hides the edge without closing the gap.
Can I fix buckled or gapped LVP without replacing the floor?
Sometimes. Pull the trim first and look for a nail, spacer, caulk or a wall touching the planks. Freeing the floor and restoring clearance often lets it settle. If the floor has no perimeter gap at all, an installer needs to trim it back.
Sources
- Why Floating Floors Need Expansion Gaps
- Shaw LVP case study on temperature
- Shaw Floorté Classic Series installation guide
- Tarkett VeriCore and IntegraCore installation instructions
- Eastern Flooring Shenandoah installation sheet
- LifeProof plank and tile installation guide
- Tilebar Rigid Core-Click installation instructions
- Lowe’s rigid core LVP installation guidelines
- CaliFloors Cali Plus installation guide
- EverStep LVP click installation guidelines
- LVP installation guide, 5/16 inch specification
- Vinyl plank flooring installation guide
- LVP transition strips installation guide