
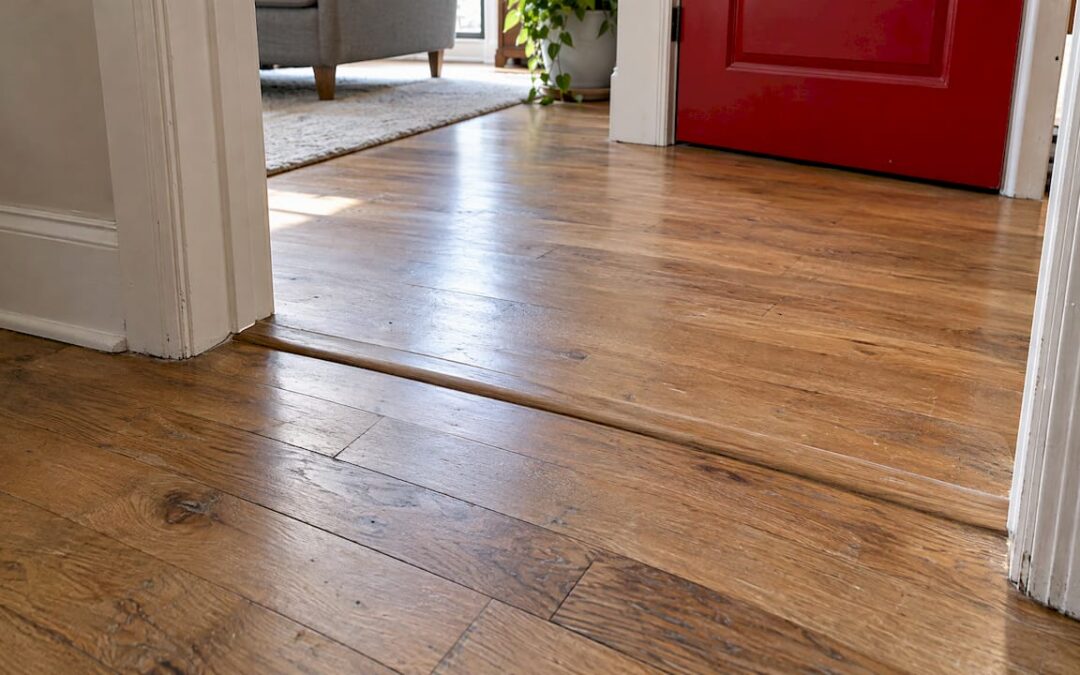
Use a T-molding when two floors meet at the same height. Use a reducer when one floor sits higher than the other and needs a gentle slope down. That single question, “are these two surfaces level or not?”, settles most doorway decisions. The rest of this guide shows you how to measure, how to pick for your flooring combination, and how each piece goes in.
What is the difference between T-molding and a reducer?
- T-molding and reducers differ primarily in their application: T-molding is used for floors of the same or very similar height, covering an expansion gap with a T-shaped profile, while a reducer creates a ramp between floors of different heights, such as hardwood to vinyl, with one thick edge and one thin edge. To determine which to use, measure each finished floor height, including underlayment and adhesive, and subtract one from the other. Note that accessibility rules treat changes over 1/4 inch as beveled and over 1/2 inch as a ramp, especially for commercial doorways. A reducer is a specific type of transition strip, which is the broader term.
Table of Contents
- The core difference between T-molding and a reducer
- How to measure the height difference
- Accessibility height limits you should know
- Matching trim to your flooring combination
- Quick decision guide
- How each one is installed
- Material and finish choices
- Common mistakes
- Our perspective
- Let us handle the transitions
- FAQ
- Sources
The core difference between T-molding and a reducer
T-molding gets its name from its cross section. A flat cap sits on top, and a stem drops down into the gap between two floors. According to Armstrong’s trim and molding guide, T-molding is used between flooring surfaces of equal height, or to join hardwood floors between rooms. A reducer has a slight slope, which makes a smooth transition between floors of different heights or different types, such as laminate or hardwood meeting carpet.
Think of it this way:
- T-molding is symmetrical. Both sides of the cap are at the same level, so it works as a bridge.
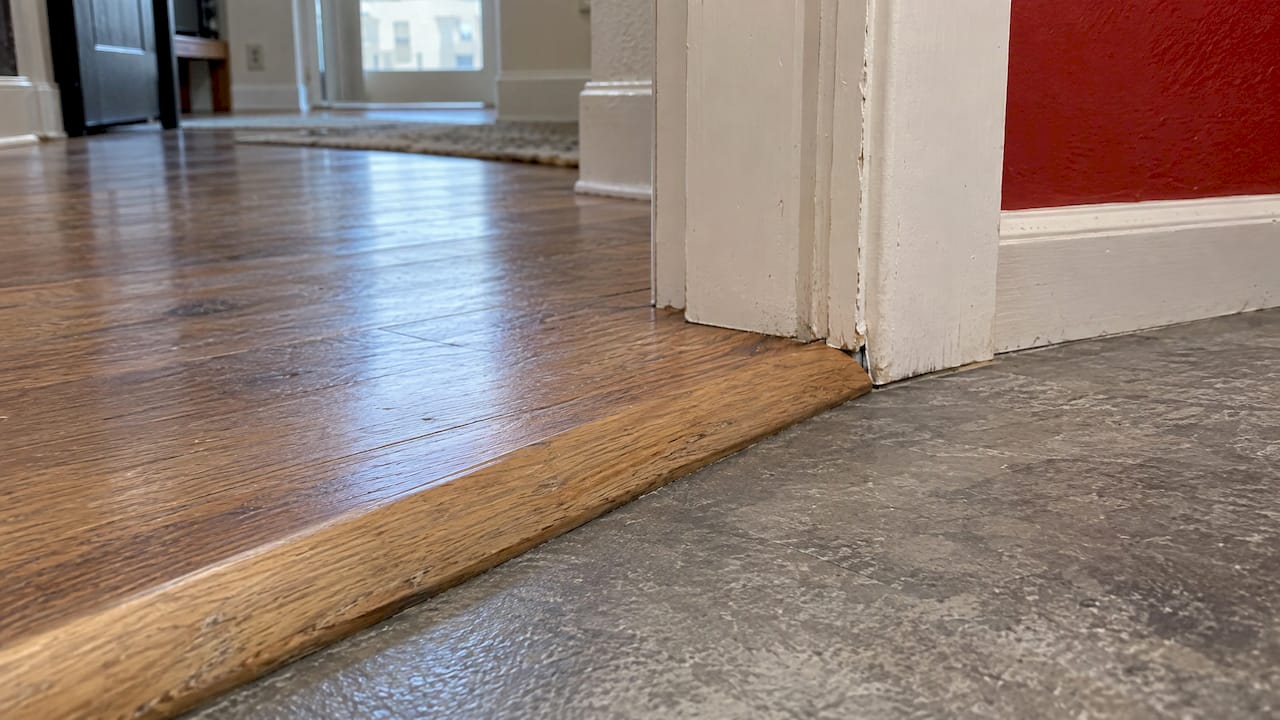
- A reducer is asymmetrical. One side is thick and sits against the taller floor. The other side is thin and tapers toward the lower floor.
Because of that shape, a T-molding forced onto a real height difference leaves one side with a lip. A reducer used on level floors creates a slope that does not need to be there. In both cases the floor works, but it looks and feels wrong, and a lip is exactly where toes catch.
Side-by-side comparison
| T-molding | Reducer | |
|---|---|---|
| Best for | Floors at the same or very similar height | Floors at different heights |
| Profile | Symmetrical T shape | Sloped, thick edge to thin edge |
| Typical spots | Doorways between rooms, narrow archways, long hardwood runs split into zones | Hardwood to vinyl, laminate to lower tile, wood to concrete |
| Which side is higher | Neither | The thick edge goes against the higher floor |
| Gap cover | Covers a gap centered under the cap | Covers the gap at the lower floor’s edge |
How to measure the height difference
The choice depends on a number, so get the number before you order trim. Many mistakes happen because someone compares the thickness of the planks alone.
- Measure each finished floor from the subfloor up. Include underlayment, adhesive, thinset and any cement backer board. A tile floor over backer board and thinset is usually much taller than the tile alone.
- Subtract the lower from the higher. That is your height difference.
- Note which floor is higher. This decides which direction the reducer faces.
- Check the doorway width so you know how much trim to buy, and whether the trim must span a wall thickness.
A typical pairing shows why this matters. Solid hardwood is commonly 3/4 inch thick. A luxury vinyl plank with attached underlayment can be only a fraction of that. Put the two in adjoining rooms and the doorway has a clear step that calls for a reducer. Two rooms of the same engineered plank, installed over the same subfloor, will meet flush and call for a T-molding.
What the numbers suggest
There is no single universal cutoff, and manufacturers set their own tolerances. As a working guide:
- Level or nearly level: T-molding.
- A small step: a low-profile reducer or a beveled transition.
- A larger step: a reducer sized to the height of the step.
- A step too large for any trim: the low side needs to be built up, or the high side feathered, before trim goes on.
That last case usually means the subfloor, not the trim, is the real project. If a room sits noticeably lower because of a prior floor removal, leveling the subfloor often produces a better result than a tall reducer. Our guide to leveling laminate on an uneven subfloor walks through the same logic.
Accessibility height limits you should know
If your property is commercial, or you want a home that works for a wheelchair or walker, change-in-level limits apply. The 1991 ADA Standards for Accessible Design say, in Section 4.5.2:
- Changes in level up to 1/4 inch may be vertical, with no edge treatment.
- Changes between 1/4 inch and 1/2 inch must be beveled with a slope no steeper than 1:2.
- Changes greater than 1/2 inch must be handled with a ramp.
Section 4.13.8 of the same document adds that a doorway threshold may not exceed 1/2 inch in height, or 3/4 inch for exterior sliding doors.
What that means for trim: a reducer is the product that creates the bevel in that middle band. Anything taller than 1/2 inch is no longer a trim decision at all. It is a ramping or leveling decision. Business owners, property managers and landlords should ask their installer how a planned transition meets the accessibility standard that applies to their building. Current ADA rules have been updated since 1991, so your local building department or an accessibility specialist can confirm which version governs your project.
Matching trim to your flooring combination
Here is how the pairings usually play out in Denver-area homes and businesses.
Hardwood to hardwood
If the same hardwood runs continuously through adjoining rooms, you often need no transition at all. A T-molding comes in when you deliberately break the floor into separate expansion zones, or when a floating floor stops at a doorway. Both sides are the same height, which is the textbook T-molding job.
Hardwood to vinyl or laminate
This is the classic reducer situation. The hardwood is taller, so the thick edge of the reducer goes against it and the thin edge slopes toward the vinyl or laminate. As Armstrong notes, a reducer is a type of transition strip, so you may also see it sold under “vinyl reducer” or “transition piece” labels. Same family, same function.
Laminate to laminate across a doorway
Laminate floats, and it needs room to expand and contract with seasonal humidity. A T-molding hides that expansion gap while letting both sides move. Colorado’s dry air and big seasonal swings make the gap more than a cosmetic detail.
Tile to wood or vinyl
Tile over backer board and thinset is often the tallest surface in the house. Meeting a thinner floor, it commonly needs a reducer or a threshold with a taller profile, and sometimes the lower floor needs a build-up. If you are planning tile with adjacent hardwood or vinyl, ask the installer to confirm the finished heights before the tile goes down, when changing the plan is cheap. See our tile floor work on the tile floor installation page.
Anything to carpet
Carpet is a special case. The cut edge needs to be gripped or it frays, so carpet usually calls for a dedicated carpet transition strip rather than a standard T-molding or reducer. We cover heights and fixes in our guide to the tile to carpet transition, and the same thinking applies to wood and vinyl meeting carpet.
Concrete and cut surfaces
Garage entries, basements and commercial spaces often involve concrete or tile that needs trimming or cutting to meet a new floor at the right height. For background on how those cuts are made, there is a helpful guide to cutting tiles and concrete that explains the methods and equipment involved. In a finished home, we handle that kind of edge work as part of subfloor preparation so the trim lands on a clean, stable base.
Quick decision guide
Walk through these questions in order:
- Are the two floors the same height, or within a hair of it? Choose T-molding.
- Is one floor clearly higher? Choose a reducer, thick edge against the higher floor.
- Is one of the floors carpet? Choose a carpet transition strip.
- Is the step more than about 1/2 inch? Treat it as a ramp or build-up job, not a trim job.
- Is the floor floating? Make sure the trim does not pin it down. It must allow movement.
- Is the building commercial or accessible? Check the step against the accessibility limits above.
How each one is installed
Both pieces typically go in using a metal or plastic track fastened to the subfloor, with the molding snapped into it. Always follow the instructions that come with your specific trim and flooring, since manufacturers differ on gap sizes. These are the main points published by flooring manufacturers.
Installing a T-molding
Shaw’s laminate molding instructions describe T-molding as the piece for two level flooring surfaces meeting, such as a doorway or narrow archway. The track attaches directly to the subfloor, positioned 1/4 inch from each adjoining floor edge. You then push the molding into the track, working left to right.
The FloorFolio installation guide agrees on the main principles: center the T-molding over the gap, secure it with the included track and screws, and keep the expansion gap so the trim does not restrict natural floor movement.
Installing a reducer
When laminate meets a lower surface, Shaw’s instructions call for a reducer strip, with 1/2 inch of space left between the finished floor and the reducer’s front edge. The track goes down first, then the reducer is pressed in, working left to right.
FloorFolio’s guidance for reducers adds a few details: align the reducer’s edge flush with the higher surface, maintain proper expansion space, center the U-track within the gap, fasten it with the supplied screws, then press the molding into the track from one end to the other.
Track or no track?
A track is the cleanest option over wood subfloors, and it is what the manufacturers above describe. Glue-down can work where a track is not practical, but it fixes the trim to one surface and can limit movement on a floating floor. Ask what the flooring manufacturer’s warranty requires, since some specify the method. Whatever the method, the molding should never lock the floor in place.
Adhesive
When adhesive is used, pick one that suits both the trim material and the surface under it. Check the trim maker’s instructions rather than guessing. A wrong adhesive can stain the floor edge or let the strip lift in a busy doorway.
Material and finish choices
Trim comes in wood, vinyl, laminate-wrapped composite and metal. Each has a role.
- Wood matches or complements hardwood and can be stained to blend with the floor.
- Vinyl and laminate trim are made to match specific collections and are the usual pick for floating floors.
- Aluminum and other metals are tough in high-traffic doorways and common in commercial spaces.
For prefinished floors, trim made to match the same line gives the closest color. If a match is hard to find, a finish carpenter can mill and finish wood trim to fit. That is one reason we handle the carpentry along with the flooring, including baseboards and quarter-round, so trim, baseboards and floor all look like one decision.
Common mistakes
- Using T-molding over a step. One side ends up with a lip that catches feet and chairs.
- Using a reducer where floors are level. It slopes where nothing needs sloping, and it looks like an afterthought.
- Measuring plank thickness only. Underlayment, adhesive, thinset and backer board all change the final height.
- Skipping the gap. Floating floors need room to move. Trim that pins the floor can lead to buckled boards or gaps.
- Forcing a trim to hide a subfloor problem. If the height difference is too big, fix the base.
- Ordering trim before the floor is chosen. Heights are not final until the flooring, underlayment and adhesive are picked.
- Putting a standard trim on carpet. Carpet needs a strip that grips the cut edge.
Our perspective
In our experience, transitions are where a good floor either looks finished or looks like a rush job. Homeowners spend weeks choosing a plank, then give the doorway trim about thirty seconds. We would rather flip that.
We start every project by measuring finished heights, not nominal thickness, because that is the only way to know whether a doorway needs a T-molding, a reducer or something else. Then we plan the transitions before the first plank goes down, so the trim and the floor are designed together.
We also think trim should be tailored to your needs, budget and timeline, just like the floor itself. A single bedroom doorway and a long commercial corridor need different answers, and we would rather explain the options than push a default. Whether it is hardwood, laminate, vinyl or tile, we install it so the transitions look intentional and hold up to daily use.
Jim
Let us handle the transitions
If you are replacing floors in one or more rooms across the Denver metro, the trim should be part of the plan from day one. Leonardo’s Flooring Corp installs hardwood, laminate, vinyl and tile, and also handles subfloor preparation, hardwood refinishing, staircases, baseboards and quarter-round trim, for homes and commercial properties. We measure the finished heights, pick the right transition for each doorway, and fit it so the whole project looks cohesive.

Look over our flooring installation services or reach out through our site to talk through your project. Our work is backed by more than 125 five-star reviews.
FAQ
Is a vinyl reducer the same as a transition piece?
In practice, yes. A reducer is one type of transition strip, made to create a slope between floors at different heights. “Transition piece” is the broader term and also covers T-moldings, end caps and thresholds. When shopping, look at the profile shape rather than just the name.
Can I use T-molding if my floors are slightly different heights?
Only if the difference is very small. T-molding is designed for the same or very similar heights, so a visible step will leave a lip on one side. If you can see or feel a step when you run your hand across the seam, a reducer is the better fit.
Which side of a reducer goes against the higher floor?
The thick edge goes against the higher floor, and the thin edge slopes toward the lower one. FloorFolio’s installation guide says to align the reducer’s edge flush with the higher surface. The track should be centered in the gap and the molding pressed in from one end to the other.
Do I need a track for T-molding?
The manufacturer instructions we reviewed use a track fastened to the subfloor, with the molding pushed into it. This lets the floors move without being pinned in place. Check your flooring and trim maker’s directions, as warranty terms can specify the method.
What if the height difference is too big for a reducer?
If the step is more than about 1/2 inch, trim alone will not solve it, and accessibility standards call for a ramp at that level. The better fix is usually to build up the lower side or level the subfloor. A flooring contractor can assess the room and recommend the cleanest approach.
Sources
- Flooring Trim and Molding, Armstrong Flooring
- Installing Laminate Floor Moldings, Shaw Floors
- FloorFolio Trims and Accessories Installation Guide
- 1991 ADA Standards for Accessible Design