Knowing how to prep subfloor correctly is the difference between a floor that lasts 20 years and one that starts squeaking, cracking, or separating within months. Most flooring failures trace back to skipped steps during preparation, not the flooring material itself. Homeowners often assume the new floor will hide whatever is underneath it. It won’t. This guide walks you through every subfloor preparation step, from the tools you need before you start to the moisture barriers that protect your investment for the long haul.
Table of Contents
- Key takeaways
- What you need before starting subfloor prep
- Inspecting, cleaning, and repairing your subfloor
- Checking and correcting subfloor flatness
- Applying primer, moisture barriers, and underlayment
- Common mistakes to avoid
- My honest take on subfloor prep
- Let the experts handle your next flooring project
- FAQ
Key takeaways
| Point | Details |
|---|---|
| Flatness is non-negotiable | Your subfloor must be flat within 3/16" over 10 feet or floating floors will creak and fail at joints. |
| Moisture causes most failures | Test relative humidity before installing any flooring, and apply a barrier if readings exceed safe thresholds. |
| Fix squeaks before you lay anything | Loose panels cause movement that cracks grout and stresses click joints in laminate and LVP. |
| Clean before you level | Remove all adhesive, nails, and debris before applying any leveling compound or primer. |
| Underlayment is not a leveling fix | Underlayment adds cushion and minor sound absorption, but it cannot compensate for an uneven subfloor. |
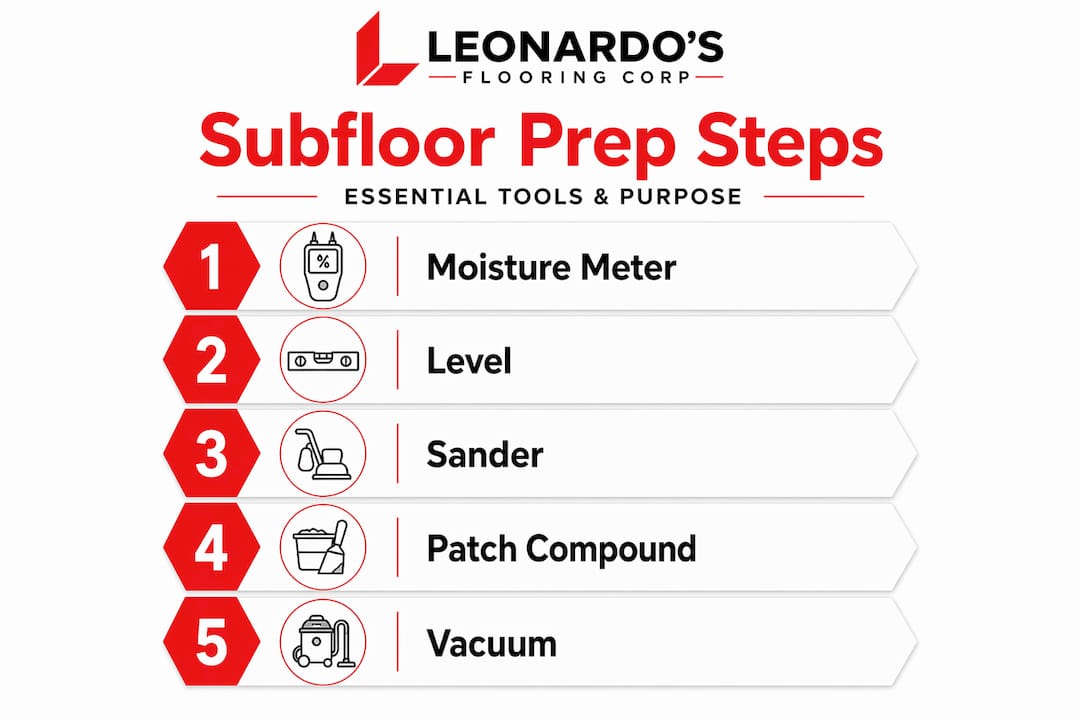
What you need before starting subfloor prep
Good subfloor preparation starts before you pick up a single tool. Read your flooring manufacturer’s installation instructions first. They specify the exact flatness tolerances, moisture limits, and underlayment requirements for that product. Skipping this step means you might do everything right by general standards but still void your flooring warranty.
Understanding what type of subfloor you have shapes every decision that follows. Wood subfloors, typically plywood or OSB panels, require different repair compounds and moisture management approaches than concrete slabs. Concrete is denser and holds moisture differently. Knowing your subfloor type upfront saves you from buying the wrong products.
Here are the tools and materials you should have on hand before starting:
- Moisture meter or calibrated hygrometer for testing subfloor relative humidity
- Long straightedge or 10-foot level to check flatness across the surface
- Pencil or chalk for marking high and low spots
- Floor scraper for removing old adhesive and debris
- Belt sander or floor grinder for sanding down high spots
- Self-leveling compound for filling dips deeper than 3 mm
- Patching compound for small cracks and holes
- Screw gun and deck screws for securing loose panels
- Construction adhesive for squeaky subfloor repairs
- Primer appropriate for your subfloor type
- Moisture barrier or vapor retarder if needed
| Tool | Purpose | Used on |
|---|---|---|
| Moisture meter | Measure subfloor humidity | Wood and concrete |
| Long straightedge | Identify high and low spots | Both |
| Belt sander / grinder | Flatten high areas | Wood / concrete |
| Self-leveling compound | Fill dips and low spots | Concrete primarily |
| Patching compound | Repair cracks and holes | Both |
| Deck screws | Secure loose subfloor panels | Wood only |
Inspecting, cleaning, and repairing your subfloor
This is where the real work happens. A 7-step preparation process is recommended by flooring professionals, and every step serves a specific purpose. Rushing through inspection is where most DIY projects go wrong.
Follow this sequence carefully:
- Walk the entire floor and press down on every section. Feel for soft spots, springiness, or bounce. These indicate rot, delamination, or structural damage that patch compound cannot fix. Those sections need full replacement.
- Identify squeaks. Mark every squeak location with chalk. Loose or squeaky panels risk structural instability and flooring joint failure. Fix them by driving deck screws through the subfloor into the joists below, countersinking the screw head just below the panel surface.
- Apply construction adhesive to joints between panels where movement is occurring. This combination of screws and adhesive significantly reduces panel movement and eliminates the squeak at its source.
- Remove all old flooring completely. This means pulling up carpet, vinyl, or tile down to the raw subfloor. Any leftover adhesive residue must be scraped off using a floor scraper. Lumps of old adhesive will telegraph through new flooring.
- Pull every raised nail and drive in any nail that is poking above the surface. A single raised nail head can create a high spot that causes laminate to click or vinyl to show a bump over time.
- Sweep and vacuum thoroughly. Dust and debris under flooring can cause adhesion problems and create noise underfoot.
- Test for moisture. Using a calibrated hygrometer, take multiple readings across the entire subfloor area. A single reading in the corner is not enough. Moisture levels can vary significantly from one side of a room to another, especially near exterior walls or below-grade spaces.
Pro Tip: If you find soft or spongy wood anywhere, probe it with a screwdriver. If the tip sinks in with moderate pressure, that section is rotted and must be cut out and replaced entirely. No patch compound will hold over rotten wood.
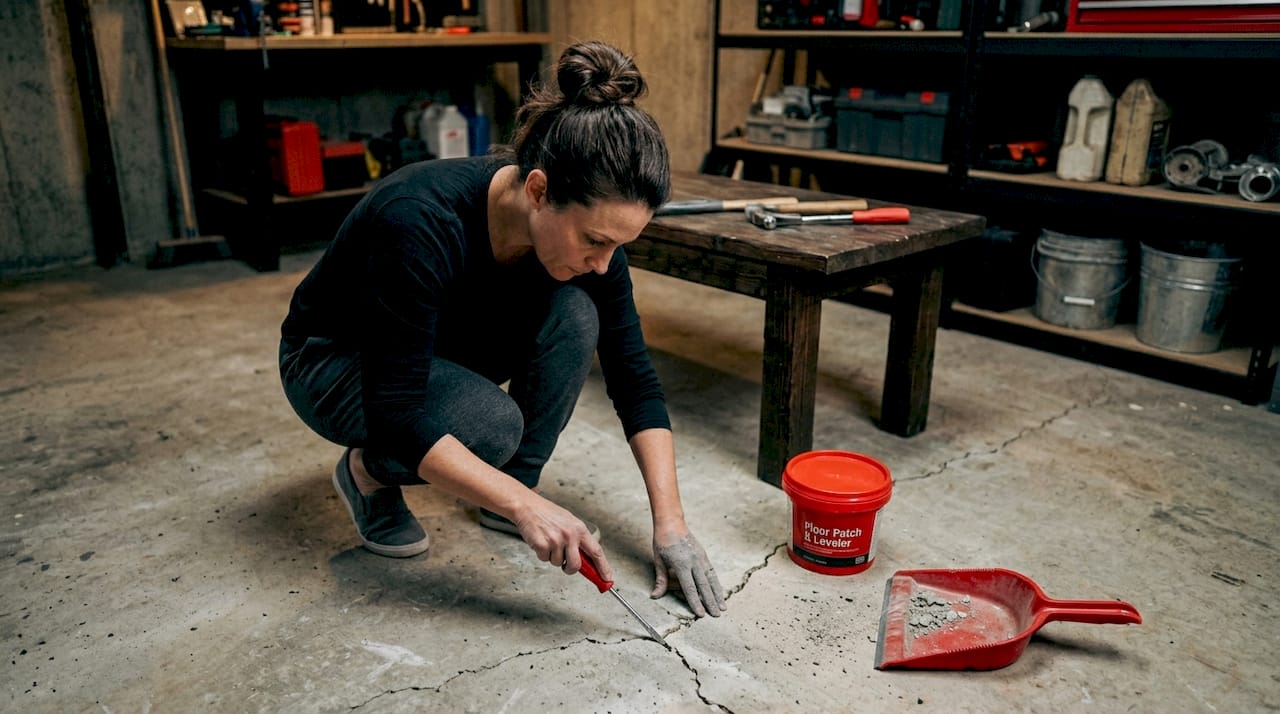
For concrete subfloors, look for visible cracks, spalling, or dusting on the surface. Cracks wider than 1/8 inch should be filled with a flexible patching compound before leveling. A dusty or powdery concrete surface will prevent proper adhesion, so address that with a concrete primer.
Checking and correcting subfloor flatness
Flatness and levelness are not the same thing. Level means perfectly horizontal. Flat means free from dips and humps relative to itself. For flooring installation, flat is what matters. Your subfloor must be flat within 3/16 inch over 10 feet to avoid flooring failure.
Follow these steps to measure and correct flatness:
- Lay your straightedge in multiple directions across the floor. Check lengthwise, widthwise, and diagonally. Problems hide in diagonal passes that you would miss going only one direction.
- Mark every gap under the straightedge with chalk. A gap larger than 3/16 inch in any 10-foot span is a low spot that needs filling.
- Mark any high spots where the straightedge rocks instead of lying flat. These need to be sanded or ground down.
- Sand high spots on wood subfloors with a belt sander. On concrete, use a floor grinder. Work gradually and re-check with the straightedge after each pass.
- Fill low spots with self-leveling compound on concrete or floor patching compound on wood. Follow the manufacturer’s cure time precisely before moving to the next step.
Pro Tip: Always check flatness after patching compounds dry. They can shrink slightly as they cure, leaving a spot that still needs a second application. One pass is rarely enough on floors with multiple dips.
Here is how flatness requirements compare across common flooring types:
| Flooring type | Flatness tolerance | Why it matters |
|---|---|---|
| Laminate (floating) | 3/16" over 10 ft | Floating floors creak and joints stress without flatness |
| Luxury vinyl plank (floating) | 3/16" over 10 ft | Thin planks telegraph every hump and dip |
| Tile | 1/8" over 10 ft | Unsupported edges crack under foot traffic |
| Hardwood (glue-down) | 3/16" over 10 ft | Adhesion fails over high or low spots |
Do not rely on thick underlayment to mask an uneven subfloor. Soft underlayment under a floating floor actually makes flatness problems worse by allowing the planks to flex into dips. Check out this DIY laminate prep guide for additional context on meeting flatness standards before installation.
Applying primer, moisture barriers, and underlayment
Once your subfloor is clean, sound, and flat, the final preparation layer protects everything above it. The correct order is to first smooth and clean, then test moisture, then apply moisture management solutions if needed. Doing it in this sequence reduces the risk of adhesive and flooring damage down the line.
Priming the subfloor improves how well adhesives and leveling compounds bond to the surface. Skipping primer on a porous concrete slab can cause leveling compound to dry too fast and crack. Priming improves adhesion and prevents floor separation. Use solvent-based primers in well-ventilated spaces and allow complete drying before proceeding.
Moisture barriers are not optional when readings are elevated. If subfloor relative humidity exceeds 75 percent, or 65 percent for wood flooring installations, you need a moisture management solution in place. High-performing epoxy membranes can isolate moisture up to 98 percent RH and cure quickly, making them a practical choice when you need to move fast. For detailed guidance on selecting the right product, this resource on moisture barriers in flooring is worth reading before you buy.
Key points on moisture barrier and underlayment installation:
- Overlap seams of sheet moisture barriers by at least 6 to 8 inches and tape every seam with moisture-resistant tape.
- On concrete slabs below grade, a 6-mil poly sheeting barrier is a minimum. For high-moisture conditions, use a dedicated epoxy or polyurethane membrane product.
- Choose underlayment based on your flooring type. Foam underlayment works for laminate. Cork suits hardwood. Combined moisture and underlayment products exist but read the spec sheet carefully.
- Do not stack a separate moisture barrier and a combined moisture plus underlayment product. You will create a surface that is too soft and flexible for the flooring to perform correctly.
- Follow manufacturer thickness specifications. Adding extra underlayment padding seems like a good idea, but it can cause floating floors to flex too much and damage click joints over time.
Common mistakes to avoid
Even experienced DIYers make these errors. Knowing them in advance saves you from tearing up new flooring weeks after installation.
- Skipping moisture testing entirely. Concrete slabs look dry but can carry moisture that only a meter will detect. Never assume a slab is dry because it looks fine.
- Taking only one moisture reading. Moisture concentrations vary across a slab. One dry corner does not mean the whole floor is safe.
- Ignoring squeaky or bouncy panels. A floor that moves underfoot will crack tile grout and stress click joints in laminate and LVP, no matter how good the flooring material is.
- Checking flatness in only one direction. Always go lengthwise, widthwise, and diagonal. You will find problems you would otherwise miss.
- Using the wrong patching compound. Gypsum-based compounds break down under moisture. Use cementitious or epoxy-based products on concrete and appropriate wood fillers on plywood.
- Ignoring the manufacturer’s specifications. Your flooring product has specific flatness and moisture limits. Those numbers exist because the product will fail outside them. Check the flooring installation guidelines for your specific floor type before you commit to a prep approach.
My honest take on subfloor prep
I’ve watched beautiful floors fail within a year, and almost every time, the cause was right there under the surface. A little moisture that “probably wasn’t a problem.” A squeak that seemed minor. A dip in the floor that the homeowner figured the underlayment would handle. It never works out that way.
In my experience, the homeowners who spend an extra day on subfloor preparation never call back with complaints. The ones who rush it almost always do. Moisture is the biggest one I see underestimated, even in Denver where the climate feels dry. Concrete slabs in basements and lower levels still carry moisture, and it will destroy your adhesive bond or cause LVP to buckle if you skip the test.
Squeaks are another one. People treat them as a minor annoyance, but squeaks signal movement, and movement is the enemy of every flooring joint, grout line, and adhesive bond above it. Spending 30 minutes with a screw gun before installation saves hours of repair work later.
My advice is simple. Treat the subfloor like it is the actual finished product. Get it clean, flat, dry, and tight. When you do that, the flooring on top of it almost installs itself, and it stays looking good for decades.
— Jim
Let the experts handle your next flooring project
If this subfloor preparation workflow feels like a lot to take on yourself, you are not alone. Getting the prep right requires the right tools, the right products, and the experience to know when something needs more than a quick fix.

Leonardosflooringcorp has spent over 10 years handling professional subfloor preparation for Denver homeowners, from simple moisture tests to full section replacements. Once the prep is done right, our team installs hardwood floors, laminate flooring, vinyl, tile, and more with the kind of quality that stands behind our 125+ five-star reviews. Contact us for a personalized assessment and quote. We will tell you exactly what your subfloor needs before a single plank goes down.
FAQ
What does it mean to prep a subfloor?
Subfloor preparation means cleaning, repairing, leveling, and moisture-testing the structural floor layer before installing finished flooring. A properly prepped subfloor is clean, flat within 3/16 inch over 10 feet, dry, and structurally sound.
How do I know if my subfloor is flat enough?
Use a 10-foot straightedge and drag it across the floor in multiple directions. Any gap larger than 3/16 inch under the straightedge is a low spot that needs to be filled with leveling or patching compound before installation.
How much moisture is too much in a subfloor?
If your subfloor’s relative humidity exceeds 75 percent, or 65 percent for wood flooring, you need a moisture management solution such as a waterproof membrane before installing any flooring material.
Do I need underlayment if I already have a moisture barrier?
Not always. Some underlayment products include a built-in moisture barrier. If you install a separate moisture barrier, use only the underlayment type specified by your flooring manufacturer. Stacking multiple layers can make the surface too soft for click-joint flooring systems.
Can I install new flooring over old adhesive residue?
No. Old adhesive creates an uneven surface that will telegraph through new flooring, especially thin vinyl or laminate. Scrape off all residue completely and verify the surface is flat before laying anything new.