
Floor covering installation is the process of selecting, preparing, and properly fitting flooring materials — tile, vinyl, laminate, or hardwood — to create durable, attractive surfaces in residential and commercial properties. Denver homeowners and business owners face specific challenges that make installation more complex than a simple YouTube tutorial suggests: altitude-driven humidity swings, temperature extremes, and concrete slabs that retain moisture far longer than most people expect. Get the process right and your floors last decades. Get it wrong and you’re looking at cracked grout, buckled planks, or debonded tile within a year. This guide walks you through every stage of the flooring installation process so you know exactly what to expect.
What are the key floor covering types and their installation basics?
The four materials that dominate Denver floor covering installation projects are ceramic/porcelain tile, luxury vinyl plank (LVP), laminate, and hardwood. Each has a distinct installation method, substrate requirement, and complexity level.
| Material | Method | Substrate Need | Typical Timeline | DIY Difficulty |
|---|---|---|---|---|
| Ceramic/Porcelain Tile | Mortar-set | Rigid, flat, deflection-controlled | 2–4 days + cure | High |
| Luxury Vinyl Plank | Click-lock float or glue-down | Flat, dry, moisture-tested | 1–2 days | Moderate |
| Laminate | Click-lock float | Flat, dry, with underlayment | 1–2 days | Moderate |
| Hardwood | Nail-down or glue-down | Structurally sound, dry | 2–3 days + acclimation | High |

Tile is the most unforgiving material on the list. The substrate must meet strict deflection limits, and a full mortar bed raises floor height by 1.25 to 2 inches, which can create door clearance problems in renovation projects. Thin-set methods reduce that height gain but demand a flatter starting surface.
Vinyl click-lock floating is the most common and recommended method over concrete because it is reversible, forgiving of minor imperfections, and far more accessible for homeowners. Glue-down vinyl works well in commercial settings with high foot traffic, but it requires a highly flat subfloor and is less practical for DIY. Laminate behaves similarly to LVP in terms of installation, though it cannot tolerate moisture the way quality vinyl can.
Hardwood installation in Denver requires the most patience. The wood must acclimate to the home’s temperature and humidity before a single nail goes down, and the subfloor must be structurally sound enough to hold fasteners without flex. For a detailed breakdown of floating floor methods covering both laminate and vinyl, the differences in underlayment and substrate prep are worth understanding before you purchase materials.
How to prepare your floor and environment for successful installation
Substrate preparation is where most floor covering failures begin. Skipping or rushing this stage is the single most expensive mistake you can make, because no amount of quality material or skilled installation compensates for a bad foundation.
For tile, the structural deflection limit is a hard engineering number, not a gut feeling. Ceramic and porcelain tile require a maximum live-load deflection of L/360, meaning a 10-foot span cannot flex more than 0.33 inches. Natural stone demands L/720, which is twice as strict. If your floor system does not meet these numbers, tile will crack and debond regardless of the mortar or grout you use. This is a spec-engineered criterion that should be verified before any materials are ordered.
Flatness tolerances matter just as much as deflection. Thinset mortar is an adhesive, not a leveling compound. Most tile failures trace back to improper substrate flatness or deflection rather than the setting material itself. High spots and low spots need to be ground down or filled with a floor-leveling compound before tile goes anywhere near the surface.
For vinyl plank over concrete, Denver’s construction environment adds a specific wrinkle. New concrete slabs retain moisture for months after pouring. Installing LVP over new concrete requires waiting at least 60 days after the pour, with 90 days preferred, plus a moisture test before installation begins. Trapped moisture causes buckling, mold growth, and adhesive failure. A vapor barrier is non-negotiable in most Denver basement and slab-on-grade applications.
Acclimation is the preparation step most homeowners skip because it feels passive. Vinyl plank flooring needs at least 48 hours in the installation room before it is laid. In Denver’s variable climate, 72 hours is safer. Manufacturers treat this as a warranty-critical requirement, not a suggestion. Hardwood needs even longer, typically 5 to 7 days, to reach equilibrium with the room’s humidity.
Pro Tip: Before any installation, run your HVAC system at normal operating conditions for at least 48 hours. Flooring acclimated in a cold, unheated space will behave differently once the heat kicks on, and that difference shows up as gaps or buckling within weeks.
The tools you need for prep include a long straightedge (6 to 10 feet) for checking flatness, a moisture meter for both concrete and wood subfloors, a floor grinder or belt sander for high spots, and self-leveling compound for low areas. Skipping any of these tools is skipping the prep itself.
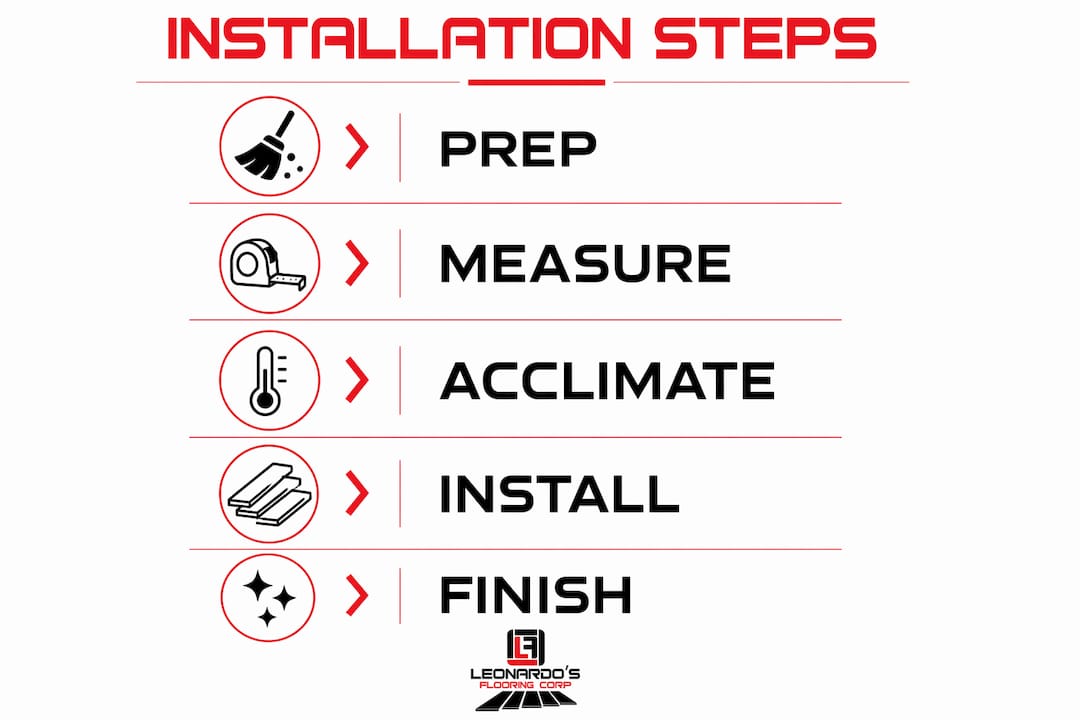
Step-by-step floor covering installation process for Denver properties
A successful installation follows a specific sequence. Jumping ahead or reversing steps creates problems that are expensive to fix after the fact.
-
Measure and plan the layout. Calculate square footage with a 10 percent overage for cuts and waste. For tile, snap chalk lines from the center of the room and verify 90-degree angles using the 3-4-5 triangle method. This keeps your layout visually balanced and minimizes awkward cuts at doorways.
-
Install substrate assemblies. For tile, this means cement backer board or an uncoupling membrane like Schluter DITRA over wood subfloors. For vinyl and laminate, it means installing the correct underlayment. For hardwood over concrete, a moisture barrier goes down first.
-
Set your starting point and dry-lay. Before any adhesive or mortar is mixed, dry-lay a row of material from your center lines to the walls. This reveals where cuts will fall and lets you shift the layout to avoid slivers of tile or plank at the perimeter.
-
Install the material. For tile, apply thinset with the correct notched trowel for your tile size, press tiles firmly with a slight twisting motion, and use spacers for consistent joints. For vinyl click-lock, start at the straightest wall, stagger end joints by at least 6 inches between rows, and tap planks together with a pull bar and tapping block. For laminate, follow the same stagger rule and leave a 1/4-inch expansion gap at all walls.
-
Place movement joints. TCNA and ANSI guidelines require movement joints at every perimeter and approximately every 25 feet indoors for tile installations. These joints must be filled with flexible sealant, not grout. Skipping them is one of the most common causes of tile cracking in Denver homes, where seasonal temperature swings create real structural movement.
-
Grout, clean, and finish. For tile, allow thinset to cure fully (typically 24 hours) before grouting. Mix grout to a peanut butter consistency, work it diagonally across joints, and clean haze before it hardens. For vinyl and laminate, install baseboards or quarter-round to cover the expansion gap.
Pro Tip: In Denver’s dry winters, the expansion gap for laminate and vinyl should be on the larger end of the manufacturer’s recommendation, typically 3/8 inch rather than 1/4 inch. The low humidity causes materials to contract more than in humid climates, and a tight gap will buckle when summer moisture returns.
How to troubleshoot common floor covering installation problems
Even well-planned projects run into issues. Knowing the cause behind each problem tells you whether it is fixable or requires a full redo.
-
Tile cracking or debonding. The cause is almost always substrate deflection exceeding the L/360 or L/720 limit, or a subfloor that was not flat enough before installation. Thinset that has less than 95 percent coverage on the tile back also causes hollow spots that crack under load. Prevention requires verifying deflection before ordering tile and back-buttering large-format tiles during installation.
-
Vinyl plank buckling or gapping. Buckling points to moisture intrusion or insufficient acclimation. Gapping between planks points to the room being too dry after installation. Both problems are preventable. Acclimation skipped as a warranty step is the most common cause of buckling in the first year.
-
Uneven subfloor telegraphing through finished floor. High spots under vinyl or laminate create a hollow, springy feel underfoot and eventually crack click-lock joints. Self-leveling compound applied before installation is the fix. Applying it after means pulling up the floor.
-
Grout cracking at perimeter joints. This is the direct result of skipping movement joints. Grout is rigid and cannot absorb the building movement that occurs at walls and columns. The fix is to remove the grout from perimeter joints and replace it with a color-matched flexible sealant.
Calling a professional installer is the right move when your subfloor fails a deflection test, when moisture readings on concrete exceed manufacturer limits, or when the scope involves multiple material transitions across a large commercial space. These are structural and technical decisions, not just installation tasks.
For Denver-specific tile installation guidance that covers substrate requirements and local climate factors in detail, the difference between a 10-year floor and a 2-year floor often comes down to decisions made before the first tile is set.
Key takeaways
Successful floor covering installation in Denver depends on substrate preparation, material acclimation, and following deflection and movement joint standards before a single plank or tile is placed.
| Point | Details |
|---|---|
| Substrate prep is non-negotiable | Deflection limits, flatness, and moisture testing must be verified before any material is installed. |
| Acclimation protects your warranty | Vinyl plank needs 48 to 72 hours in the room; hardwood needs 5 to 7 days before installation. |
| Movement joints prevent tile failure | TCNA/ANSI standards require flexible sealant joints at perimeters and every 25 feet indoors. |
| Denver climate demands extra caution | Moisture in new concrete slabs and seasonal humidity swings require larger expansion gaps and vapor barriers. |
| Most failures are substrate failures | Thinset, grout, and click-lock systems perform correctly when the subfloor is flat, dry, and structurally sound. |
What I’ve learned after 10 years of Denver floors
The single most consistent pattern I see in failed floor covering installations is that someone skipped the boring part. Not the tile selection, not the grout color, not the plank width. The boring part: checking deflection, testing moisture, letting the material sit in the room for two days before touching it.
Denver’s climate is genuinely harder on floors than most homeowners realize. The humidity in January can drop to 15 percent indoors. By July, the same room might sit at 55 percent. That 40-point swing is why I push larger expansion gaps here than I would in a coastal market. I have seen beautiful laminate floors buckle in June because the installer followed the minimum gap spec from a manufacturer based in Georgia. The spec was technically correct for Georgia. It was wrong for Denver.
The other thing I tell every client: do not let anyone talk you into skipping the moisture test on a concrete slab. I have seen brand-new slabs in commercial builds fail a moisture test at 90 days. The contractor wanted to push ahead on schedule. The client pushed back, waited another 30 days, retested, and passed. That patience saved a full LVP replacement that would have cost more than the original installation. Moisture is invisible until it is not, and by the time you see it, the damage is done.
If you are weighing DIY against hiring a professional flooring contractor, the honest answer is that laminate and click-lock vinyl are genuinely manageable for a careful homeowner with a flat, dry subfloor. Tile over wood subfloors and hardwood nail-down installations are not. The margin for error is too small, and the cost of fixing a bad tile job is almost always higher than the cost of hiring someone competent the first time.
— Jim
Get your Denver floor covered right the first time
Leonardo’s Flooring Corp has handled floor covering installation across the Denver metro for over 10 years, from single-room tile updates to full commercial renovations. As certified Home Depot Contractors with 125+ five-star reviews, the team brings the substrate prep discipline, local climate knowledge, and material expertise that separates a floor that lasts from one that fails. Whether you need hardwood floor installation, tile floor installation, vinyl, or laminate, every project is scoped to your specific space, budget, and timeline. No cookie-cutter bids. No surprises on install day. Reach out to Leonardo’s Flooring Corp for a consultation and get the floor done right.
FAQ
What is floor covering installation?
Floor covering installation is the complete process of preparing a subfloor, selecting the appropriate flooring material, and fitting that material correctly to create a finished surface. It includes substrate prep, moisture testing, acclimation, and material-specific setting or locking methods.
How long does floor covering installation take?
Vinyl plank and laminate installations typically take one to two days for an average room. Tile requires two to four days plus a 24-hour thinset cure before grouting. Hardwood adds acclimation time of five to seven days before the one to two day installation.
Do I need to test for moisture before installing vinyl plank over concrete?
Yes. New concrete slabs should cure for at least 60 days, preferably 90, before vinyl plank is installed. A moisture test is required regardless of slab age, and a vapor barrier is recommended for most Denver basement and slab-on-grade applications.
Why do tile floors crack after installation?
Tile cracks most often because the subfloor deflects beyond the L/360 limit for ceramic and porcelain or L/720 for natural stone. Missing movement joints at perimeters and field transitions are the second most common cause, as rigid grout cannot absorb structural movement.
Can I install laminate flooring myself in Denver?
Click-lock laminate is one of the more DIY-accessible floor covering options, provided the subfloor is flat, dry, and structurally sound. Denver’s dry winters require using the larger end of the manufacturer’s expansion gap recommendation to prevent buckling when summer humidity returns.