The layout laminate flooring pattern you choose determines both the visual character of a room and the structural performance of the floor itself. In industry terms, this is called the installation pattern or plank layout pattern, and it covers everything from how joints are staggered to the angle at which planks are laid. Get it right, and your floor looks intentional, hides seams naturally, and holds up for decades. Get it wrong, and you risk joint failure, buckling, and a floor that looks cheap regardless of what you paid for it. This guide covers every decision point, from pattern selection to expansion gaps, so you can plan with confidence.
What are the common laminate flooring layout patterns?
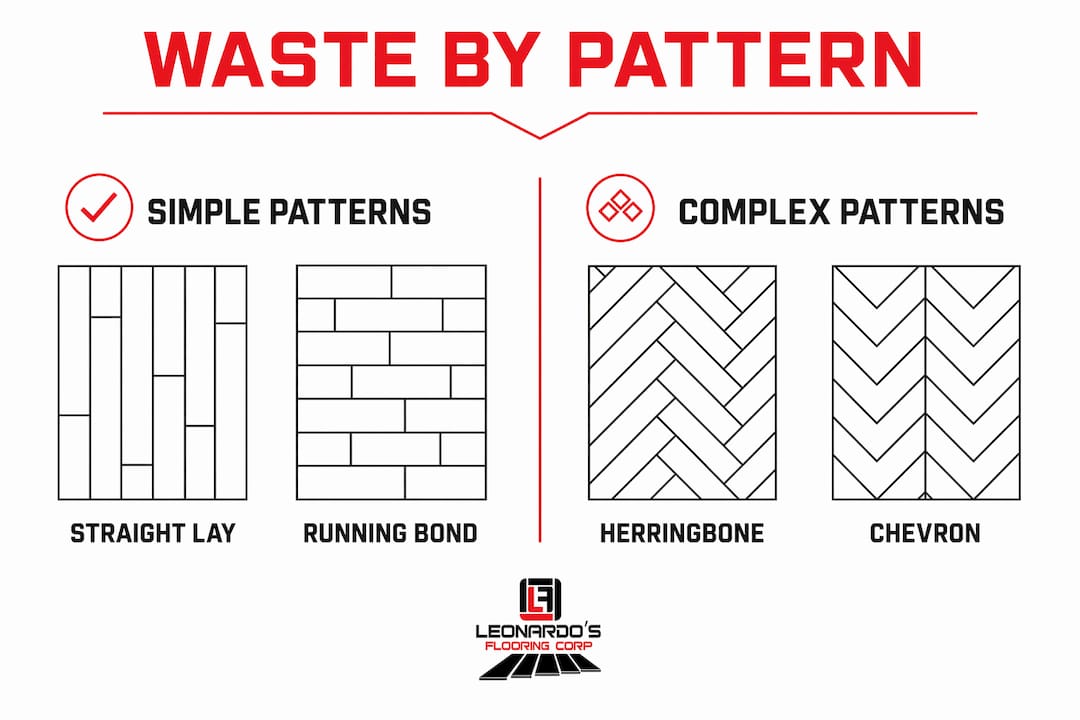
Laminate flooring patterns fall into two broad categories: straight-lay patterns and angled patterns. Each produces a distinct visual effect and carries different installation demands.
Straight-lay patterns are the most common choice for residential floors:
- Running bond (straight stagger): Planks run parallel to the longest wall, with end joints offset by a set amount each row. This is the standard starting point for most installations.
- Brick/half-offset: Each row shifts exactly half a plank length, mimicking traditional brick coursing. The result is a clean, symmetrical look that works well in modern and transitional interiors.
- One-third offset: Joints shift by one-third of the plank length per row, creating a subtler repeat pattern. Many designers prefer this over the half-offset because it avoids the mechanical, almost tiled appearance that half-offset can produce in longer planks.
- Random stagger: Joints are offset by varying amounts within manufacturer-specified minimums. This mimics natural hardwood most closely and is the go-to for wood-look laminate.
Angled patterns add drama but require more planning:
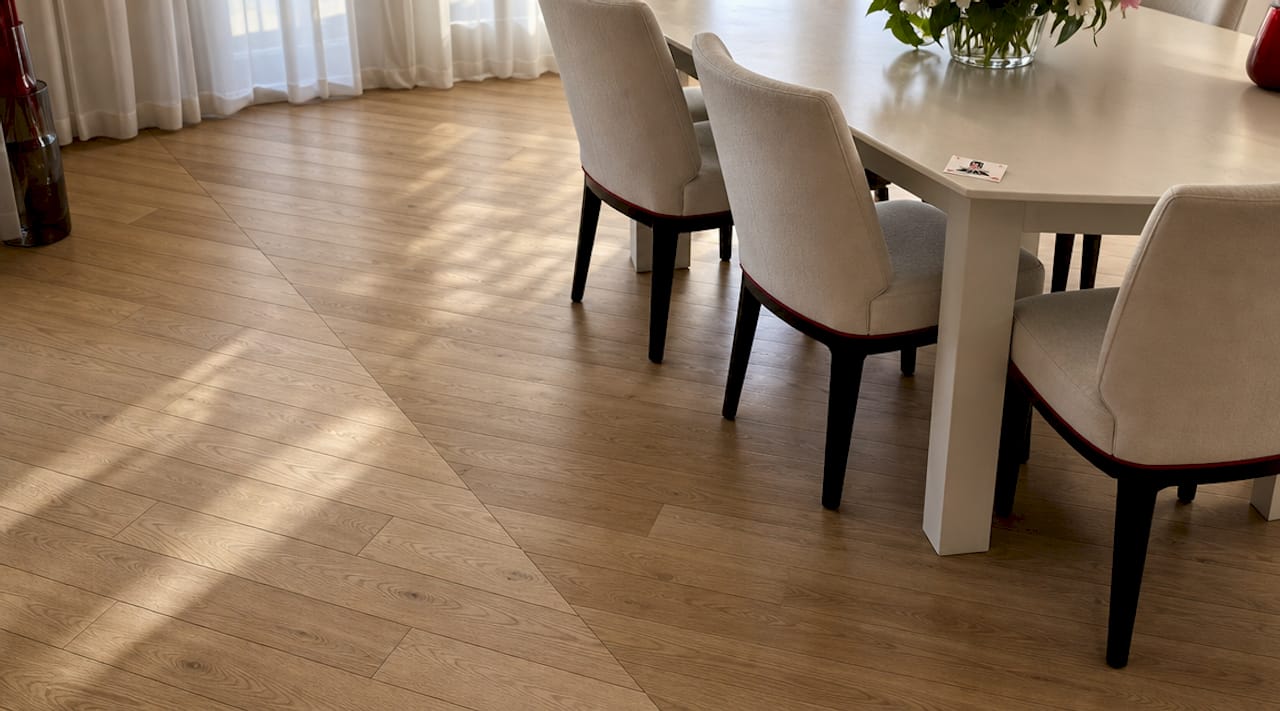
- Diagonal: Planks run at 45 degrees to the walls. This visually expands smaller rooms and draws the eye across the space rather than down its length.
- Herringbone: Planks are cut at 45 degrees and arranged in a V-shape. The result is bold and architectural, popular in formal dining rooms and entryways.
- Chevron: Similar to herringbone but with planks cut at an angle at both ends so the V-points meet precisely. Chevron reads as more refined than herringbone and is increasingly popular in 2026 laminate trends.
| Pattern | Visual Effect | Relative Waste |
|---|---|---|
| Running bond / random stagger | Natural, elongated | 5–8% |
| Brick / half-offset | Symmetrical, structured | 5–8% |
| Diagonal | Expansive, dynamic | 10–13% |
| Herringbone / chevron | Bold, architectural | 15–20% |
The table above reflects contractor waste estimates by pattern type. More complex patterns mean more angled cuts at borders, which drives up both waste and labor time.
How does plank staggering affect floor performance and appearance?
Staggering is not a stylistic preference. Staggering joints is a structural requirement that ties directly to the locking system’s performance and the long-term stability of the floor. When end joints align across adjacent rows, the floor loses lateral strength, and the click-lock connections are placed under uneven stress that leads to lifting and separation over time.
Here is how to plan staggering correctly:
- Follow the manufacturer’s minimum offset. Most products specify a minimum of 6 inches between end joints in adjacent rows. Premium or longer planks often require 8 to 12 inches. Never guess. Pull out the installation instructions and confirm the exact number before you cut a single plank.
- Avoid H-joints. An H-joint occurs when the end joints in rows 1, 2, and 3 align in a straight line across three consecutive rows. This is the single most common structural mistake in DIY laminate installs.
- Never start or end a row with a piece shorter than 8 inches. Short starter pieces compromise the locking mechanism at the row’s beginning and end, which is where stress concentrates during seasonal movement.
- Use cut-offs from one row to start the next. This is the most efficient way to maintain stagger while minimizing waste. If you cut 14 inches off the last plank in row 1, that 14-inch piece can start row 2, provided it meets the minimum offset requirement.
- Dry-lay three to four rows before committing. Lay the planks without locking them to visualize the stagger pattern, check border cuts, and confirm that no short pieces fall at doorways or focal points.
Pro Tip: Mix planks from at least three different cartons as you install. Manufacturers batch their print patterns, and pulling from a single carton creates visible repetition that makes the floor look artificial. Mixing cartons is the fastest way to achieve a natural, professional result.
How does layout direction affect the look of a room?
Plank direction is one of the most impactful decisions you make, and it costs nothing to get right. Running planks lengthwise along the longest wall elongates the room visually, making narrow spaces feel wider and longer spaces feel more proportional.
The light source matters just as much as the wall direction. Aligning planks parallel to the main light source, typically the largest window or sliding door, reduces the visibility of seams because light hits the floor at a shallower angle. When planks run perpendicular to light, every seam casts a small shadow and the floor reads as busier than it actually is. For living rooms with large south-facing windows, this single adjustment can make a mid-grade laminate look like a premium product.
Start your layout from the longest, most visible wall in the room. This is usually the wall you see first when entering. Centering the layout on this wall, rather than starting flush against it, prevents the awkward situation of having a full plank on one side and a sliver on the other. For open floor plans that flow through multiple rooms, maintaining a consistent direction across the entire space creates visual continuity and avoids the choppy look of direction changes at transitions.
Pro Tip: Before you commit to a direction, stand in the room’s main entry point and look toward the focal wall. The planks should draw your eye toward that focal point, not across it. If they run perpendicular to your sightline, the room will feel cut short.
What are the expansion gap requirements for laminate flooring?
Expansion gaps are the pressure relief system for a floating laminate floor. Floating floors require consistent gaps around the entire perimeter because laminate expands and contracts with changes in temperature and humidity. Without those gaps, the floor has nowhere to move and it buckles.
The standard perimeter gap is 3/8 inch (approximately 10 mm), though some manufacturers specify up to 1/2 inch for wider planks or rooms with significant climate variation. Denver’s dry climate and seasonal temperature swings make gap compliance especially critical. A floor installed tight to the baseboard in January may buckle by July.
Key rules for gap management:
- Leave the specified gap at every wall, door casing, cabinet toe kick, and fixed object.
- Never let trim, transition strips, or furniture permanently block the gap. Baseboards should cover it visually without pressing against the floor.
- For long continuous runs, some manufacturers specify a maximum uninterrupted floor length of 30 to 50 feet before a transition strip is required. Check your product specs.
- Acclimate planks in the installation room for 48 to 72 hours before laying them. This brings the planks to the room’s ambient humidity, reducing post-installation movement.
Blocking the expansion gap is the leading cause of laminate buckling. It does not matter how well the pattern is planned or how carefully the stagger is executed. If the floor cannot move, it will fail.
Subfloor preparation is equally non-negotiable. The subfloor must be flat to within 3/16 inch over a 10-foot span. High spots cause hollow spots in the click-lock connection; low spots cause the floor to flex and eventually crack at the joints.
How to minimize waste when planning your laminate pattern
Pattern complexity correlates directly with higher waste, and waste should factor into your budget before you purchase materials. A straight-lay pattern in a rectangular room needs roughly 5 to 8 percent overage. A diagonal layout in the same room pushes that to 10 to 13 percent. Herringbone or chevron in a room with multiple doorways and alcoves can reach 15 to 20 percent waste.
Three practices reduce waste without compromising the layout:
Plan your starter length deliberately. The length of the first plank in row 1 determines the stagger sequence for the entire floor. Use a layout planner tool like CalcuFloor to calculate the optimal starter length before cutting. A well-chosen starter length distributes cuts evenly and reduces the number of pieces that fall below the 8-inch minimum.
Reuse offcuts strategically. Every cut piece that meets the minimum offset and minimum length requirements is a usable plank. Keep a separate pile of offcuts organized by length. Before cutting a new plank, check the offcut pile first.
Account for room shape early. Irregular rooms with bay windows, closets, or angled walls generate more border cuts than rectangular rooms. Map these boundary conditions on paper or in a tool like the flooring selection guide before ordering materials. Ordering 10 percent overage for a straight-lay pattern in a complex room is smarter than ordering 7 percent and running short mid-install.
Pro Tip: Order all your material from the same production batch (same dye lot). If you need to order more mid-project, a different batch may have a visible color shift. Buying a little extra upfront is always cheaper than a mismatched patch.
Key takeaways
The right laminate floor layout pattern balances visual intent, structural stagger rules, expansion gap compliance, and material efficiency from the first plank to the last border cut.
| Point | Details |
|---|---|
| Pattern choice drives waste | Straight lay needs 5–8% overage; herringbone and chevron require 15–20%. |
| Staggering is structural | Minimum 6-inch offsets and no pieces shorter than 8 inches protect the locking system. |
| Direction affects perception | Running planks parallel to the main light source reduces seam visibility and improves appearance. |
| Gaps prevent buckling | A 3/8-inch perimeter gap is the standard minimum; blocking it causes floor failure regardless of pattern quality. |
| Dry-lay before committing | Laying three to four rows without locking reveals stagger issues, short pieces, and border problems before they are permanent. |
Why I always solve the boundaries first
After more than a decade installing floors across the Denver metro, the single biggest mistake I see on DIY and contractor jobs alike is starting in the middle of the room without solving the perimeter first. People get excited about the pattern, they start laying planks, and then they reach the far wall and discover they have a 2-inch sliver running the entire length of the room. That sliver looks bad, it is structurally weak, and it is completely avoidable.
My process on every job starts at the boundaries. I measure the room, calculate the border cut width on both sides, and adjust the starter plank length until both sides land on a cut that is at least half a plank wide. For herringbone and chevron patterns, I go further and snap a center line down the room’s length and width, then build the pattern outward from that intersection. Achieving a perfect layout requires solving boundaries with symmetry, especially around doorways, corners, and built-ins where the eye naturally goes.
I also push back on the idea that herringbone is just a style upgrade. It is a geometry project. Minor angle errors compound quickly, and by the time you reach the far wall, a half-degree mistake at the start can produce a border gap that varies by an inch or more. If you are doing herringbone yourself, check your angle every five rows with a reliable square. Do not trust your eye.
The other thing I tell every homeowner: the locking system is only as good as the subfloor under it. I have seen beautiful pattern work fail in six months because the installer skipped subfloor prep. Flatten the subfloor, acclimate the planks, and leave the gaps. Everything else is details.
— Jim
Get expert laminate flooring installation in Denver
Planning a laminate floor layout involves more decisions than most homeowners expect, and the cost of a mistake is measured in wasted material, failed joints, and floors that need to be pulled up and redone. Leonardosflooringcorp handles every step of the process, from pattern selection and dry-lay planning to subfloor preparation and final installation, with full compliance to manufacturer specs and warranty requirements. Whether you are considering a classic running bond for a bedroom or a bold herringbone for an entryway, the team at Leonardosflooringcorp brings the experience to execute it correctly the first time. Explore professional laminate installation in Denver and get a project estimate tailored to your space, pattern choice, and budget.
FAQ
What is the most common laminate flooring layout pattern?
The running bond pattern, also called straight stagger, is the most widely used laminate floor layout pattern. It offsets end joints by a minimum of 6 inches per row, producing a natural wood-look appearance with the lowest material waste of any pattern.
How much extra material should I order for a herringbone pattern?
Herringbone and chevron patterns require 15 to 20 percent overage due to the angled cuts at every border. Rooms with irregular shapes or multiple doorways push waste toward the higher end of that range.
What happens if I skip the expansion gap?
Blocking the perimeter expansion gap prevents the floating floor from moving with temperature and humidity changes, which causes buckling and peaking. Most manufacturers void the warranty if gaps are obstructed by trim, cabinetry, or fixed objects.
How do I choose which direction to lay laminate planks?
Run planks parallel to the longest wall and parallel to the main light source. This combination elongates the room visually and minimizes seam visibility by reducing the shadow each joint casts under direct light.
Can I use cut-off pieces to start a new row?
Yes, and you should. Cut-off pieces from the end of one row can start the next row, provided they meet the manufacturer’s minimum offset requirement (typically 6 inches) and are at least 8 inches long. This practice reduces waste and maintains proper stagger throughout the floor.